
Your checkout works, but it still feels old. A customer clicks “buy,” leaves your site, lands on a hosted payment page, then returns after payment. That flow is reliable, but it often feels disconnected from the rest of your product.
Organizations often consider Stripe Embed Checkout when they aim for an on-site flow. They want an on-site flow without taking on the full burden of building and maintaining every payment field themselves. The promise is simple: keep users on your page, keep sensitive payment handling inside Stripe's infrastructure, and avoid turning your frontend team into a payments company.
In practice, the choice is less about visuals and more about control. You're deciding how much UI flexibility you need, how much payment logic you want to own, and how much post-payment plumbing you're prepared to maintain. If you're also trying to reduce drop-off earlier in the funnel, it's worth pairing the implementation work with proven checkout UX thinking, like Up North Media's proven strategies on cart abandonment.
Table of Contents
- From Redirects to On-Site Conversion
- Hosted checkout when speed matters most
- Elements when checkout is part of the product
- Embedded Checkout when you want the middle ground
- Server setup and session creation
- React client mounting the embedded form
- The return page and session status check
- Common implementation gotchas
From Redirects to On-Site Conversion
A lot of teams land here after a familiar sequence. They launched quickly with a redirect checkout. It worked. Then product started asking for a tighter flow, marketing wanted a cleaner brand experience, and support kept hearing from users who thought they had been sent somewhere else.
That pressure is real. So is the temptation to overcorrect and build a custom card form from scratch.
The better move, in many cases, is to keep the payment infrastructure managed while moving the experience into your app. Stripe's embedded Checkout exists in that middle zone. Stripe's quickstart shows it as a Checkout Session workflow that you insert directly into your site, not as a separate payment stack, and the return flow still depends on retrieving the Checkout Session status after the user comes back to your page through the embedded Checkout quickstart.
Practical rule: If your team wants an on-page payment experience but doesn't want to own card field behavior, embedded checkout is usually the first option worth prototyping.
There's another detail that matters more than it first appears. Stripe documents that embedded Checkout can be customized through branding settings and the Checkout Sessions API, including collection options like addresses and prefilled customer data in the same embedded Checkout quickstart. That means you can shape the conversion layer without rebuilding the payment UI from first principles.
The mistake I see most often is framing this as a pure frontend upgrade. It isn't. Changing checkout affects fulfillment, account creation, subscription handling, and settlement expectations. The payment form is the visible part. The operational path after payment is where most integrations get fragile.
Choosing Your Integration Path
Before you write code, decide what you need from checkout. Organizations often choose between three models: hosted Checkout, Elements, and embedded Checkout. They overlap, but they solve different problems.

Hosted checkout when speed matters most
Hosted Checkout is the least demanding option operationally. You create a Checkout Session, redirect the user, and let Stripe handle the payment UI on a Stripe-hosted page.
Use it when:
- You need to ship quickly. A small team can get to production faster with fewer UI edge cases.
- You don't need checkout to feel native. If the user expects a standard pay flow, the redirect is often acceptable.
- You want fewer frontend moving parts. Less client code means fewer rendering issues, fewer style conflicts, and fewer browser-specific surprises.
Hosted is still a strong choice for MVPs, internal tools, and products where the payment page is not part of the product experience.
Elements when checkout is part of the product
Elements gives you the most control. You design the page, place the components where you want them, and shape the flow around your product logic.
That control comes with work:
| Path | UX control | Dev effort | Typical fit |
|---|---|---|---|
| Hosted Checkout | Low | Low | Fast launches, simpler teams |
| Elements | High | High | Custom products, complex UI |
| Embedded Checkout | Medium to high | Medium | On-site checkout without full custom build |
Elements makes sense when the purchase flow is tightly bound to the product itself. Think seat selection, in-app upgrades, complex configuration screens, or highly opinionated branded experiences.
If you're comparing non-redirect options more broadly, this guide to a Stripe alternative for online businesses is useful because it frames the decision around operational needs, not just frontend preferences.
Embedded Checkout when you want the middle ground
Embedded Checkout is the compromise that often holds up well in production. You keep the payment surface on your site, but you still use the Checkout Session model and Stripe-managed infrastructure.
A key deployment point is localization. Stripe documents that Checkout supports more than 125 local payment methods, 30+ languages, and 135+ currencies on its Checkout UI in the Checkout docs. If you embed it and then hard-code your product assumptions around cards only, you're leaving part of the value on the table.
Teams get better results when they treat embedded checkout as a regional conversion surface, not just a prettier card form.
There is also some messaging overlap across Stripe's public pages, so you'll see different counts depending on which product page or documentation surface you're reading. The important engineering takeaway is not the exact marketing line. It's that embedded Checkout inherits a mature Checkout platform with localization and payment-method routing built in, rather than forcing you to build country-specific versions yourself.
The weak spot of embedded Checkout is also its strength. Because it abstracts a lot, it won't satisfy teams that want total control over every interaction. If your checkout is a major part of your product's differentiation, Elements may still be the better fit.
Building an Embedded Checkout Flow Step by Step
Most embedded checkout guides stop right before the useful part. They show the happy path, then skip over the places where teams usually lose time: where to create the session, what to return to the client, how to handle the return page, and which parts you should never trust from the browser.
A straightforward mental model is this: your server creates the Checkout Session, your client mounts the embedded UI, then your return page checks the session state. For a broader look at how this fits into backend design, this article on payment gateway API integration patterns is a good companion.
Here's the flow at a glance.

Server setup and session creation
Start with a small Node.js and Express backend.
// server.jsimport express from "express";import Stripe from "stripe";import dotenv from "dotenv";dotenv.config();const app = express();app.use(express.json());const stripe = new Stripe(process.env.STRIPE_SECRET_KEY);app.post("/api/create-checkout-session", async (req, res) => {try {const session = await stripe.checkout.sessions.create({mode: "payment",ui_mode: "embedded",line_items: [{price: process.env.STRIPE_PRICE_ID,quantity: 1,},],return_url: `${process.env.APP_URL}/return?session_id={CHECKOUT_SESSION_ID}`,});res.json({ clientSecret: session.client_secret });} catch (err) {console.error("Session creation failed", err);res.status(500).json({ error: "Unable to create checkout session" });}});app.get("/api/session-status", async (req, res) => {try {const session = await stripe.checkout.sessions.retrieve(req.query.session_id);res.json({status: session.status,paymentStatus: session.payment_status,customerEmail: session.customer_details?.email || null,});} catch (err) {console.error("Session lookup failed", err);res.status(500).json({ error: "Unable to fetch session" });}});app.listen(4242, () => {console.log("Server running on port 4242");});A few points matter here.
ui_mode: "embedded"is what tells Stripe you want the embedded form.return_urlstill matters, even though the form is on your site.- Return only what the client needs. In this case, that's the session client secret.
Stripe's quickstart also documents customer_creation = 'always' for cases where you want a customer created whenever one isn't provided, which is especially useful for subscriptions and repeat purchases in the embedded Checkout quickstart.
If your business model depends on future billing, account history, or customer support lookup, set that intentionally instead of trying to reconstruct customers later.
After the backend shape is in place, it helps to sanity-check the visual flow and form friction against practical ecommerce design ideas. I like this collection of strategies for ecommerce sales growth because it focuses on real checkout behavior instead of abstract CRO talk.
React client mounting the embedded form
On the client, fetch the client secret from your backend, then initialize Stripe.js and mount the embedded checkout.
// CheckoutPage.jsximport { useEffect, useRef, useState } from "react";import { loadStripe } from "@stripe/stripe-js";const stripePromise = loadStripe(import.meta.env.VITE_STRIPE_PUBLISHABLE_KEY);export default function CheckoutPage() {const containerRef = useRef(null);const [error, setError] = useState("");useEffect(() => {let embeddedCheckout;async function init() {try {const response = await fetch("/api/create-checkout-session", {method: "POST",headers: { "Content-Type": "application/json" },});const { clientSecret, error } = await response.json();if (error) throw new Error(error);const stripe = await stripePromise;embeddedCheckout = await stripe.initEmbeddedCheckout({clientSecret,});embeddedCheckout.mount(containerRef.current);} catch (err) {console.error(err);setError("Could not load checkout");}}init();return () => {if (embeddedCheckout) embeddedCheckout.unmount();};}, []);if (error) return <p>{error}</p>;return <div ref={containerRef} />;}A small but important note: mount cleanup matters. In React apps with route transitions or strict mode behavior during development, failing to unmount can produce confusing duplicate initialization issues.
Later in the flow, a short video walkthrough can help if you want to compare your implementation shape against a working example:
The return page and session status check
Your return page should not guess. It should retrieve the session status from your server.
// ReturnPage.jsximport { useEffect, useState } from "react";export default function ReturnPage() {const [session, setSession] = useState(null);useEffect(() => {const sessionId = new URLSearchParams(window.location.search).get("session_id");if (!sessionId) return;fetch(`/api/session-status?session_id=${encodeURIComponent(sessionId)}`).then((res) => res.json()).then((data) => setSession(data)).catch((err) => console.error(err));}, []);if (!session) return <p>Loading payment status...</p>;if (session.status === "complete") return <p>Payment complete.</p>;return <p>Payment not completed yet.</p>;}This follows Stripe's documented pattern for embedded Checkout. The return page loads, then retrieves the Checkout Session status using the session ID from the return URL.
Don't treat the return page as fulfillment confirmation. Treat it as customer-facing status only.
Common implementation gotchas
The docs give you the shape. Production gives you the edge cases.
- Don't create sessions from the browser. Price selection, quantities, and discount logic belong on the server.
- Don't trust query params for entitlement. A user can arrive on
/returnwithout completing anything. - Keep your checkout container stable. CSS layout shifts can break the feel of the payment flow even when the integration is technically correct.
- Think about customer creation early. If you plan to support subscriptions or repeat purchases, customer records should be part of the first implementation, not a later patch.
Another practical lesson is that embedded checkout improves continuity, but it doesn't erase all UX work. You still need a coherent order summary, clear pricing, and a calm error state.
Handling Post-Payment Events with Webhooks
A completed browser flow is not the same thing as a completed business event. Users close tabs. Mobile browsers pause requests. Redirects fail for reasons that have nothing to do with payment success.
That's why webhooks are essential for anything that grants access, creates an order, or starts a subscription.
Why the browser is not your source of truth
If you rely on the return page alone, you eventually create one of two bad outcomes. Either you fulfill an order based on a client-side assumption, or you fail to fulfill a legitimate payment because the browser never finished the round trip.
The server-to-server event is the source of truth. For a Checkout-based flow, the event teams usually care about first is checkout.session.completed.
The frontend tells the user what happened. The webhook tells your system what to do.
That distinction keeps your system sane when traffic grows.
A minimal webhook endpoint
In Express, signature verification requires the raw request body. Don't parse the webhook route with the normal JSON middleware before verification.
// webhook.jsimport express from "express";import Stripe from "stripe";import dotenv from "dotenv";dotenv.config();const app = express();const stripe = new Stripe(process.env.STRIPE_SECRET_KEY);app.post("/webhook",express.raw({ type: "application/json" }),(req, res) => {const sig = req.headers["stripe-signature"];let event;try {event = stripe.webhooks.constructEvent(req.body,sig,process.env.STRIPE_WEBHOOK_SECRET);} catch (err) {console.error("Webhook signature verification failed", err.message);return res.status(400).send(`Webhook Error: ${err.message}`);}if (event.type === "checkout.session.completed") {const session = event.data.object;console.log("Checkout session completed:", session.id);// Example actions:// - mark order as paid// - provision account access// - enqueue email confirmation// - store customer and session metadata}res.json({ received: true });});app.listen(4243, () => {console.log("Webhook server running on port 4243");});Two mistakes show up constantly:
- Using parsed JSON instead of the raw body, which breaks signature verification.
- Doing too much work inline before returning a success response.
If you need slow fulfillment steps, enqueue them. A webhook handler should verify, persist what matters, trigger downstream work, and respond quickly.
What to do after verification
After the event is verified, keep your fulfillment path boring and deterministic.
A reliable pattern looks like this:
- Store the event ID to avoid duplicate processing.
- Match the session to your internal order or account using metadata you set at session creation time.
- Apply entitlement server-side. Don't let the client grant itself access.
- Log state transitions clearly so support can trace failures without reading raw webhook payloads.
If you're selling subscriptions, community access, or feature provisions, your actual product logic is embedded within these offerings. The checkout is only the trigger.
Testing Security and Preparing for Launch
Most checkout bugs are not glamorous. They're environment mistakes, mismatched keys, CORS surprises, or webhook endpoints that worked locally and fail in production.
Treat launch prep like systems work, not design polish.
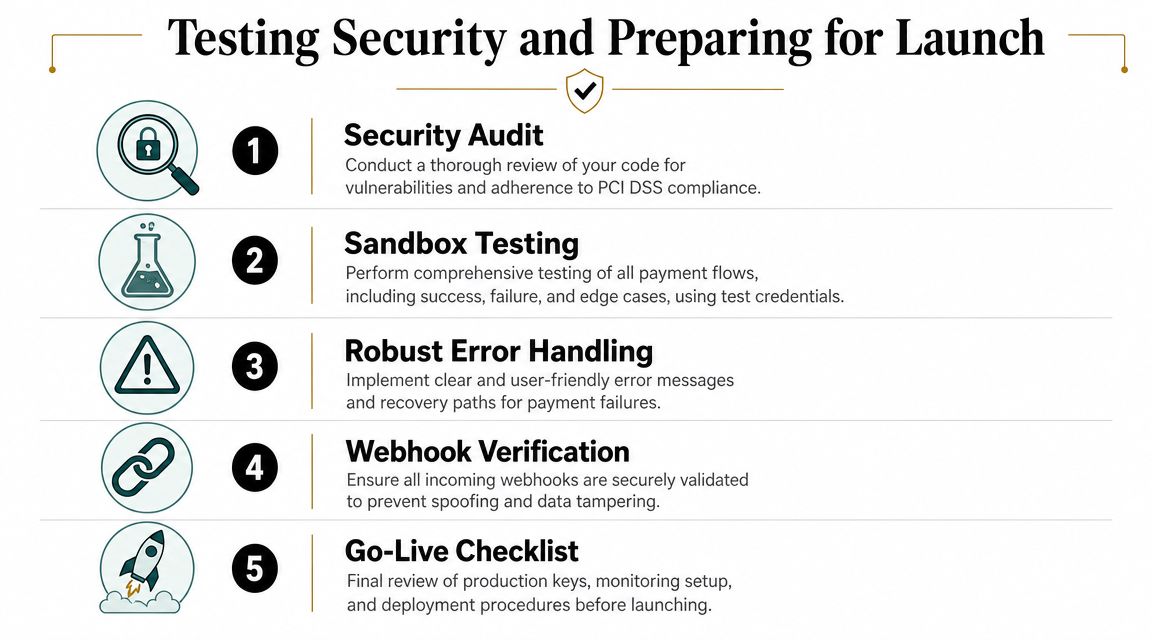
What to test before real traffic hits
Run through the full purchase lifecycle in test mode, including success paths, failure paths, and interrupted flows.
Use a checklist:
- Successful payment flow: Session creates, embedded form renders, return page loads, webhook fires, order updates.
- Declined or failed payment: Error messaging stays clear and the page remains usable.
- User abandonment: Leaving the flow midway doesn't create phantom paid orders.
- Repeat attempt behavior: A user can retry without creating duplicated fulfillment.
For practical card-testing references, keep a separate launch checklist with Stripe test card guidance so your team can reproduce known scenarios consistently.
Stripe also states that Checkout supports over 40 payment methods and is built on Stripe.js, which is mobile-ready and intended to improve conversion on its Checkout product page. The practical takeaway is that you're not launching a brand-new payment surface. You're launching on top of a mature one, which helps, but only if your own application logic around it is solid.
Security checks that catch real mistakes
Security issues in these integrations usually come from the glue code around the payment layer.
Check these before launch:
- Environment separation: Test keys and live keys should never mix across frontend, backend, and webhook config.
- Server-owned pricing: The client should never define the amount to charge.
- Webhook signature verification: This should fail loudly if the secret is wrong.
- Minimal secret exposure: Publishable key on the client, secret key on the server. Nothing else.
- Return page behavior: It should show status, not grant access.
PCI scope is also one reason teams choose embedded or hosted surfaces over fully custom payment collection. Keeping card entry inside a managed UI sharply reduces the amount of sensitive handling your own stack needs to own.
A final rule I use in launches is simple: if support can't answer “why didn't this user get access?” from logs and order records alone, the integration isn't ready yet.
Beyond the Checkout What About Settlement
A clean on-site checkout solves the front-end conversion problem. It doesn't solve what happens after the payment lands.
For many international businesses, the harder problem starts after authorization. Settlement delays, bank routing constraints, payout friction, and forced currency conversion turn a good checkout into a messy back office process.

Checkout is only the front half of the payment problem
Developers often stop at “payment succeeded.” Finance teams can't.
They care about questions like:
- Where do funds settle?
- How many banking steps sit between sale and usable cash?
- How painful is reconciliation across currencies and regions?
- Can the business receive revenue in a form that's useful globally?
This matters most for SaaS, agencies, creator businesses, and remote-first companies selling across borders from day one. The prettier the checkout gets, the more obvious the settlement bottleneck becomes.
A different model for getting paid
One modern alternative is to separate how the customer pays from how the business gets paid. That's the model behind Suby, which provides an API that lets businesses accept payments by card or crypto while receiving settlement in USDC. It also offers native Discord and Telegram integrations for subscriptions, paid access, and online communities. The core operational idea is simple: users pay with cards, businesses receive USDC.
That framing changes the settlement discussion. Instead of optimizing only for front-end conversion, you optimize the full path from payment to usable funds. For some businesses, especially those operating globally without wanting more banking complexity, direct USDC payouts are a cleaner fit than traditional payout rails.
This is also why embedded checkout decisions shouldn't be made in isolation. A strong payment stack is not just an attractive form in your app. It's customer payment UX, server-side reliability, and a settlement model that matches how your business operates.
If you're building for global customers and you want a simpler path from checkout to payout, Suby is worth a look. It lets businesses accept payments by card or crypto and receive funds in USDC, with API and webhook support plus native Discord and Telegram integrations for subscriptions, paid access, and online communities.