

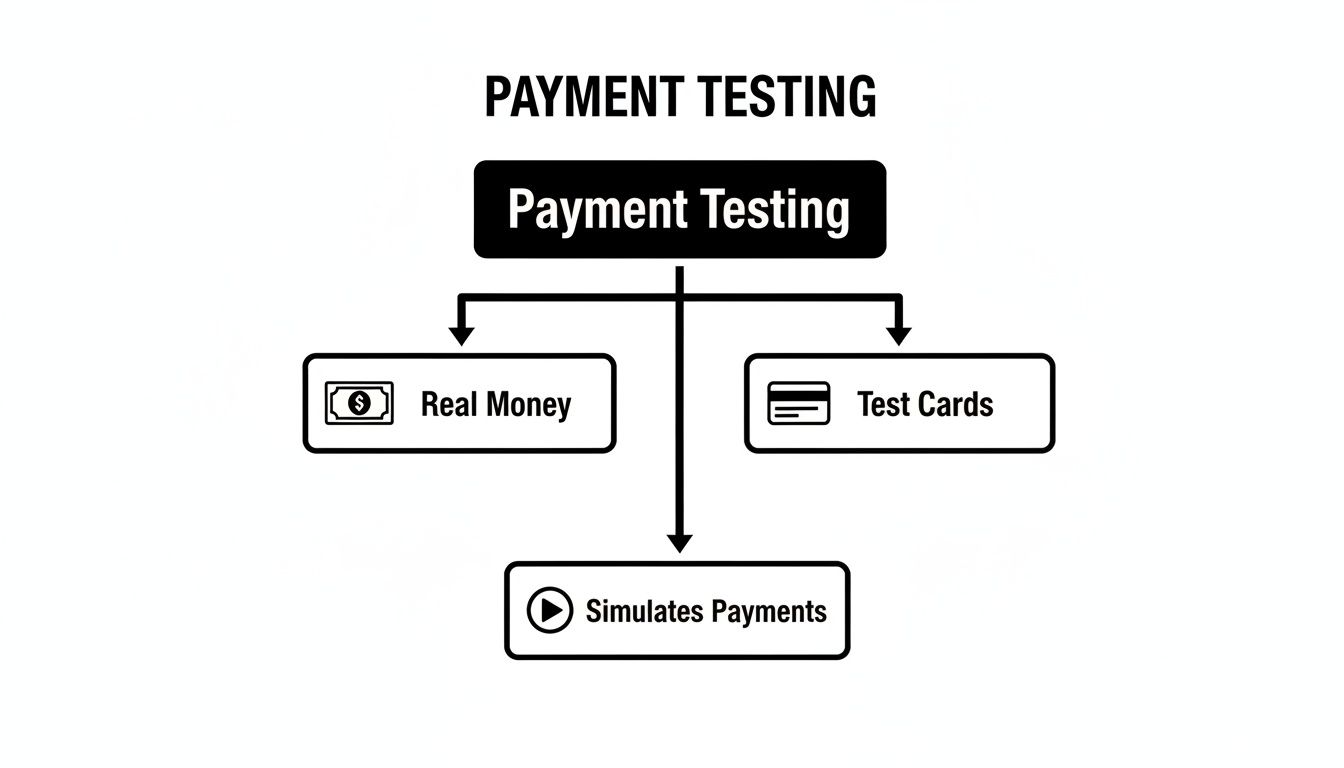
So, you’re getting ready to take payments with Stripe. Before you flip the switch and start processing real money, you absolutely need to know your checkout process is rock-solid. But how do you test everything without charging actual credit cards?
This is where Stripe's test cards come in. They are special, non-real card numbers that let you safely simulate all kinds of payment scenarios in Stripe's testing environment.
What Are Stripe Test Cards and Why Are They Essential?
Think of test cards as the ultimate dress rehearsal for your payment system. They are like prop money for a movie, they look and act real within the controlled environment of your test setup, but they have no actual value and can't be used for real purchases.
Each test card number is designed to trigger a specific, predictable result. One number will always lead to a successful payment, another will always be declined for insufficient funds, and yet another will prompt a security challenge. This lets you see exactly how your integration behaves in every situation, all without a single real dollar changing hands.
Putting your system through its paces with these cards is non-negotiable for a few big reasons:
- You can confirm everything works. Does your payment form correctly send data to Stripe? Do your backend systems respond the right way? Test cards let you verify every step.
- You can build a better user experience. What does your customer see when their card is declined? Testing these failures lets you craft helpful error messages instead of just showing a generic "payment failed" notice.
- You can prevent lost sales. A buggy checkout is a business killer. By finding and fixing issues before you go live, you ensure that real, paying customers don't get frustrated and leave.
Essentially, Stripe test cards are a core tool for any developer or business owner building a payment integration. They let you safely simulate transactions without any financial risk. As outlined in Stripe’s excellent developer documentation, a universal test card like 4242 4242 4242 4242 is your go-to for simulating a successful payment. Just use it with any future expiration date and a random 3-digit CVC.
Understanding how a payment gateway works behind the scenes can also give you a deeper appreciation for these interactions. This kind of testing is a fundamental step for any business that wants to accept payments online, especially if you're a business owner who wants customers to pay by card and for you to receive USDC. For a deeper dive, Stripe's own documentation on testing payments is an invaluable resource.
The Most Common Stripe Test Cards and Their Scenarios
To really bulletproof your checkout, you need to test more than just a happy-path, successful payment. Things go wrong in the real world, cards get declined, funds run low, and security checks pop up. Stripe gets this, so they provide a whole toolbox of test cards, each one designed to trigger a specific, predictable outcome.
Think of it as a controlled experiment. You can see exactly how your system reacts when a customer’s card is declined for insufficient funds or flagged for a fraud review. This guide will walk you through the most essential test cards and the scenarios they simulate, so you can build a checkout flow that’s resilient and user-friendly, no matter what happens.
Building a smooth global checkout is crucial, especially if you're aiming to let customers pay how they want while you, the business owner, get your payouts in USDC. Testing is where that reliability begins.
The real beauty of test cards is that they let you simulate all these payment events safely. You can build, debug, and perfect your integration without ever touching a real dollar, eliminating any financial risk.
Key Test Cards for Success and Declines
First things first, you need to cover the basics: a card that always works and a few that always fail. This is fundamental. It lets you confirm that your core payment logic is solid and, just as importantly, that your error handling guides users correctly when something goes wrong.
For any of the cards below, feel free to use any 3-digit CVC (like 123) and any expiration date in the future (like 12/29). Stripe isn't picky about these details in test mode.
A Note on Testing: Your goal isn’t just to process payments; it’s to create a checkout experience that feels trustworthy. When a payment fails, a clear, helpful error message, tested with these very cards, can guide a customer to fix a typo or try another card. That simple step can be the difference between a lost sale and a happy customer.
To get you started, here is a quick-reference table with the most common test cards you'll likely use every day.
Stripe Test Card Numbers for Common Scenarios
This table lists the essential Stripe test card numbers and the specific transaction outcomes they are designed to simulate. It's a great starting point for testing your primary payment flows.
These core Stripe test cards are the foundation of any solid QA process. For example, we use these exact scenarios to rigorously test our API, ensuring that merchants who accept card payments and receive USDC have a completely dependable system.
Whether you're using our native integrations for platforms like Discord and Telegram or building a custom solution with our API, running these basic tests is the first, most critical step toward building a truly resilient payment system. In the next section, we’ll dive into more advanced scenarios.
Testing for More Than Just Success: Declines, Fraud, and Other Hiccups
Getting that "Payment Successful" message feels great, but let's be real, transactions don't always go smoothly. In the real world, cards get declined for all sorts of reasons. If you only test for the happy path, you're setting yourself up for confused customers and lost sales when the inevitable error pops up.
This is exactly why Stripe test cards are so powerful. They’re not just for verifying that payments work; they’re for simulating what happens when they don’t. Think of it as a fire drill for your checkout process. You need to know how your system will react when a bank says "nope" because of a wrong CVC, a card is reported lost, or it sends back a vague "Do Not Honor" message.
By running through these failure scenarios in a safe test environment, you can build smarter, more helpful error messages. A generic "Payment Failed" is a dead end. Guiding your customer with "Looks like the CVC is incorrect, please double-check and try again" can turn a lost sale into a successful one.
Simulating Common Card Declines
Stripe has a whole set of test card numbers designed to fail in specific ways, mimicking real-world bank responses. This lets you see exactly how your application handles different kinds of declines. For example, what happens when a recurring subscription payment fails? Your system should have a plan. If you want to dive deeper into that, you might find our guide on what the dunning process is useful for managing those situations.
Here are a few essential decline scenarios you should absolutely be testing:
- Incorrect CVC: Grab any valid test card number and expiration date, but intentionally type in the wrong CVC (like
123). This is one of the most common user mistakes. - Incorrect Postal Code: Use a valid test card but a fake postal code. This is crucial for checking how your Address Verification System (AVS) settings hold up.
- Generic Bank Declines: Stripe offers specific cards that will always trigger a generic "Do Not Honor" or "Invalid Transaction" response from the simulated bank.
Walking through these flows is about more than just finding bugs. It's about ensuring you can give legitimate customers clear feedback so they can fix the problem and complete their purchase. This is non-negotiable, especially for businesses that rely on an API to handle global payments.
Getting Ahead of Fraud and Risky Payments
Simple declines are one thing; fraud is another beast entirely. A common threat is card testing, where fraudsters use scripts to rapidly check the validity of long lists of stolen card numbers on unsuspecting merchant sites. These tactics have gotten more sophisticated over time. What started as brute-force guessing has evolved into using massive data leaks, which means a higher hit rate for them and more chargeback headaches for you.
The good news is you can prepare for this. Stripe gives you test cards that are specifically designed to be flagged by its Radar fraud detection system. When you use these cards in test mode, you can see precisely how your integration responds to transactions that Stripe considers high-risk.
This kind of proactive testing is a huge part of a solid fraud prevention strategy. In fact, Stripe's own research shows that its machine learning defenses have cut down successful card testing attacks by a staggering 80%. You can read more on Stripe's blog about how they're fighting back.
How to Use Stripe Test Cards in Your Integration
Alright, now for the fun part. Knowing what Stripe test cards are is one thing, but actually getting your hands dirty and using them is where the real learning begins. Let's walk through how to put these tools into practice.
We'll look at two main ways to do this: a quick visual check right inside your Stripe Dashboard and the more technical approach using an API.
No matter which method you choose, everything happens in Stripe’s test mode. Think of it as a completely separate sandbox, walled off from real money and live transactions. It’s your safe playground to experiment, squash bugs, and fine-tune your payment flow without worrying about accidental charges.
Creating a Test Payment in the Stripe Dashboard
The fastest way to see if things are working is to run a test directly from your Stripe Dashboard. This is perfect for a quick, manual check to confirm that a payment can be created on the back end. It won't test your actual checkout form, but it's a fantastic first step.
Here’s the process:
- Toggle to Test Mode: First things first, find the "Test mode" toggle in your Stripe Dashboard, it's usually in the top left. Make sure it's switched on. Everything you do now is just a simulation.
- Navigate to Payments: Head over to the "Payments" section and hit the "+ Create" button to get started.
- Enter Payment Details: A form will pop up. You can put in any amount and currency you like. For the card, just pop in a Stripe test card number, like the classic
4242 4242 4242 4242. - Add Customer Information: You can either create a new test customer on the fly or pick an existing one. Any future expiration date (like 12/29) and any 3-digit CVC (like 123) will work just fine.
- Submit the Payment: Click "Create payment." If all goes well, you’ll see a brand-new successful payment pop up in your list of test data.
This simple check gives you instant feedback that your basic setup can initiate a payment. It's a great confidence booster before you start digging into the code.
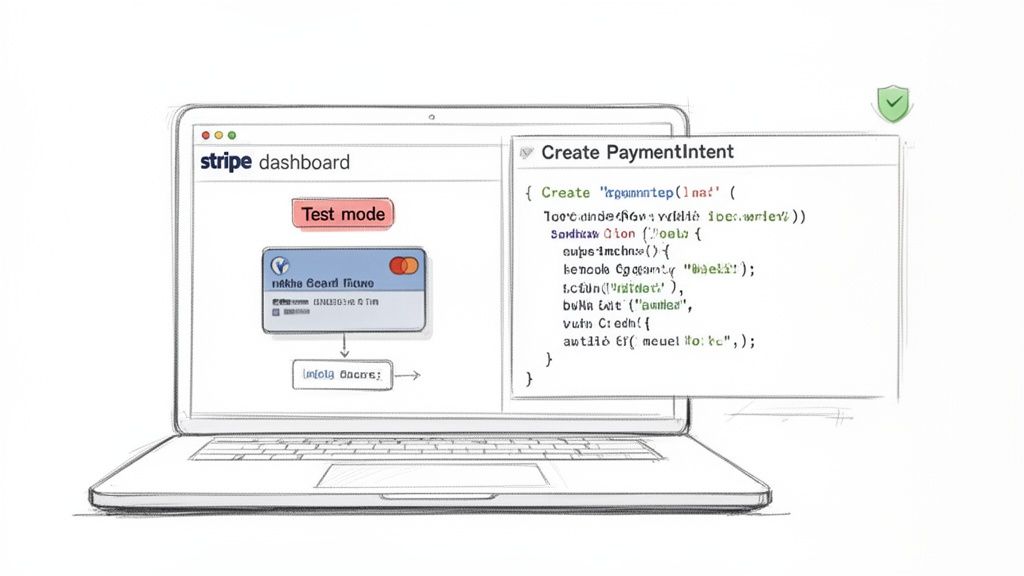
Using Stripe Test Cards with an API
For a more robust test that actually mimics how your customers will check out, you'll want to use an API. You must only use your test-mode API keys. These are completely different from your live keys and guarantee that every request goes to a test environment, not the real world.
A typical flow involves creating a payment request on your server and then using the test card details on your front-end to confirm it. Our API allows any business to accept payments by card or crypto, and we also offer native integrations with Discord and Telegram.
A
PaymentIntentis basically an object that tells a payment processor you intend to collect a payment. It keeps track of the entire payment journey, from the moment it's created, through any authentication hoops, all the way to the final confirmation.
Here’s a conceptual cURL example showing how you might create a PaymentIntent. In a real-world application, this logic would be running on your server, not in your command line.
curl https://api.stripe.com/v1/payment_intents
-u sk_test_...: \ # Your TEST secret key
-d amount=2000
-d currency=usd
-d "payment_method_types[]=card"
This request tells the payment processor you want to create a payment for $20.00. It then sends back a client_secret, which your front-end code uses along with a test card number to finalize the payment.
For a deeper dive into the actual code and a more detailed walkthrough, check out our guide on payment gateway API integration. This full-stack approach lets you test your entire payment flow from end to end, which is essential for any business that needs to accept cards and get reliable USDC payouts.
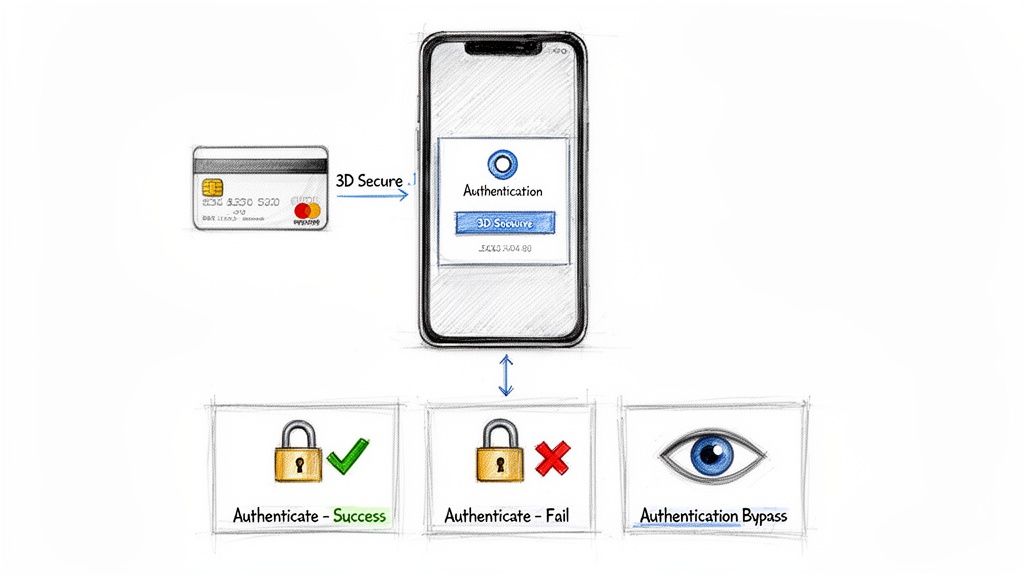
Simulating SCA and 3D Secure Authentication
When you're accepting card payments, security isn't just an afterthought, it’s the bedrock of your entire checkout process. One of the most critical security layers you'll deal with is Strong Customer Authentication (SCA), which you’ve likely seen in action through a process called 3D Secure. Think of it as that extra verification step, like a pop-up from your bank asking for a one-time code, that confirms the person making the purchase is the actual cardholder.
This authentication dance is a legal must-have in Europe and is quickly becoming a standard practice everywhere else. That means testing this scenario isn't just a good idea; it's essential. If your checkout stumbles when faced with a 3D Secure challenge, you're going to see legitimate payments fail, which leads straight to confused customers and lost sales.
The need to get this right is only growing. As e-commerce has boomed, so has online fraud. In 2021, for example, card testing attacks hit 40% more businesses, and global fraud jumped by 11%. These aren't just numbers; they represent real threats. It shows why simulating every twist and turn of the payment journey, especially security checks, is so important for protecting your business. You can dig deeper into these trends in a detailed report from Stripe.
Test Cards for 3D Secure Scenarios
So, how do you test for this? Thankfully, Stripe has a set of specific Stripe test cards built just to trigger these 3D Secure outcomes. Using them lets you walk through the exact experience your customers will have, helping you build a checkout that can handle authentication without a hitch.
Here are the main test cards you'll want to have handy:
- Card for Successful Authentication: Use this card to simulate a smooth, frictionless 3D Secure flow. The test "bank" will authenticate the payment automatically without requiring any extra steps from the user. This is your best-case, low-risk scenario.
- Card Requiring Authentication: This one is crucial. It mimics a situation where the bank decides it needs more proof. In test mode, it will open a mock authentication page where you can choose to either "Complete authentication" or "Fail authentication."
- Card That Fails Authentication: This test card will always fail the 3D Secure challenge, triggering a declined payment. It’s perfect for testing your error messages and making sure you guide the user on what to do next.
Testing these flows ensures your checkout experience remains smooth. When a customer is prompted for verification, your interface should clearly explain what's happening. A little guidance can prevent them from thinking the payment failed and abandoning their cart.
How to Trigger the 3D Secure Flow
Using these cards is simple. Just pop the card number into your checkout form while you’re in test mode, exactly like you would with any other test card. The specific card number is the key here, it’s what tells Stripe which 3D Secure behavior to simulate. The payment amount or other details don’t really matter for this particular test.
By running through successful authentications, failed attempts, and even bypassed checks, you can prepare your system for just about anything. This level of thorough testing is vital, whether you're building a custom checkout with our API to accept card payments and receive USDC, or using our native integrations for Discord and Telegram. At the end of the day, a reliable payment experience builds trust, and trust is what fuels growth.
Best Practices for Testing Your Payment Flow
Let's pull all these ideas together. A really solid testing strategy is what separates a fragile payment system from a truly resilient one. Using Stripe test cards is more than just a box-ticking exercise; it’s about proactively building a checkout experience that can handle the good, the bad, and the just plain weird with grace. Your test plan is the blueprint for getting there.
While we all want payments to succeed, your most valuable lessons will come from testing the failures. This means you need to simulate everything you can think of, from simple declines and "insufficient funds" errors to trickier authentication challenges and even disputes. Put yourself in your customer's shoes and try to break things.
Create a Comprehensive Test Plan
Great testing starts with a bit of organization. Don't just start plugging in card numbers at random. A structured plan that maps out all the potential outcomes is a much better approach.
- Test every card type: Make sure you run through successful payments, a wide variety of declines, and the different 3D Secure challenges.
- Validate user feedback: For every failure, look at the error message your customer gets. Is it clear? Is it helpful? Does it actually tell them how to fix the problem?
- Check your backend logic: Confirm that your system is doing what it's supposed to do. It should correctly log successful payments, flag failed attempts, and trigger the right follow-up actions, like sending a "payment failed" email.
Your goal here is to eliminate surprises. When a real customer’s card is declined, it shouldn't be the first time your system has seen that specific error code. A well-tested flow can turn a potential disaster into a guided, positive customer interaction.
Of course, the security of sensitive cardholder data is always top of mind. Following a thorough PCI DSS compliance checklist is non-negotiable. Even though test cards don't involve real data, your live system will, so it's critical to build secure habits from the very beginning.
These core principles are universal. It doesn't matter if you're building a complex custom integration with our API or using our native integrations for Discord and Telegram. By testing your payment flow from top to bottom, you build a trustworthy system that lets customers pay easily with their card, ensuring your business gets stable, predictable USDC payouts.
Got Questions About Stripe Test Cards? We’ve Got Answers.
Even after walking through the process, you might still have a few questions about how Stripe test cards work in practice. Let's tackle some of the most common ones that pop up.
Can a Stripe Test Card Ever Charge Real Money?
Absolutely not. Test cards are specifically designed to be non-functional numbers that only work inside Stripe’s test environment.
They have zero connection to any live banking network. Think of it like using monopoly money in a board game, it looks like the real thing, but it has no actual value and can't be used outside the game. This separation ensures you can experiment freely without any risk of accidentally charging a real account.
How Can I Test Cards from a Specific Country or a Different Brand?
Stripe has you covered here. Beyond the standard Visa and Mastercard numbers, they offer a whole library of test cards for different scenarios. You can easily find numbers for brands like American Express or Discover, as well as cards issued in specific countries, such as Canada or the UK.
This is incredibly useful for making sure your checkout form is ready for a global audience.
A key part of global payment acceptance is ensuring your checkout works for everyone. Testing with country-specific cards helps confirm that your address fields and validation logic perform correctly for international customers.
What Should I Do If My Test Payment Fails Unexpectedly?
If a test payment fails when you were expecting it to go through, the first thing to check is your environment. It's a surprisingly common mistake to mix up your test and live settings.
Here’s a quick two-step diagnostic:
- First, confirm you’re in test mode within your Stripe Dashboard.
- Second, double-check your code to ensure you’re using your test API keys, not your live ones.
Using a live key with a test card (or the other way around) will always trigger an error. This simple check is often all it takes to fix the problem and get back on track.
Ready to stop worrying about payment friction and start accepting global payments with ease? At Suby, our API and native integrations let you accept card payments from anywhere and receive stable USDC payouts instantly.