
A payment gateway API integration is what lets you connect your website or app directly to a payment processor. Think of it as the digital plumbing that allows you to securely accept credit cards and crypto payments right on your own platform, without kicking customers over to a third-party page to finish a purchase.
Why Modern API Integration Is a Game-Changer
For any business selling online, whether you're running a SaaS platform or an e-commerce store, the way you handle payments is everything. It's not just a technical box to check; it is the engine that fuels your revenue and builds customer trust. A clunky payment process can kill a sale in seconds.
We've all been there. You're ready to buy, and the site sends you to a generic, third-party page that looks nothing like the brand you were just shopping with. It feels jarring, a little sketchy, and it's a huge reason for abandoned carts.
It's surprising, but an estimated 40-60% of software vendors still rely on these legacy systems. Those outdated interfaces and fragmented experiences chip away at customer confidence, and that directly hurts conversion rates.
To see just how big the difference is, let's compare the old way with the new.
Legacy vs Modern API Integration at a Glance
The takeaway is pretty clear. The modern, API-first approach isn't just a minor upgrade; it's a fundamental shift in how you build and scale your business online.
A Unified Approach to Global Commerce
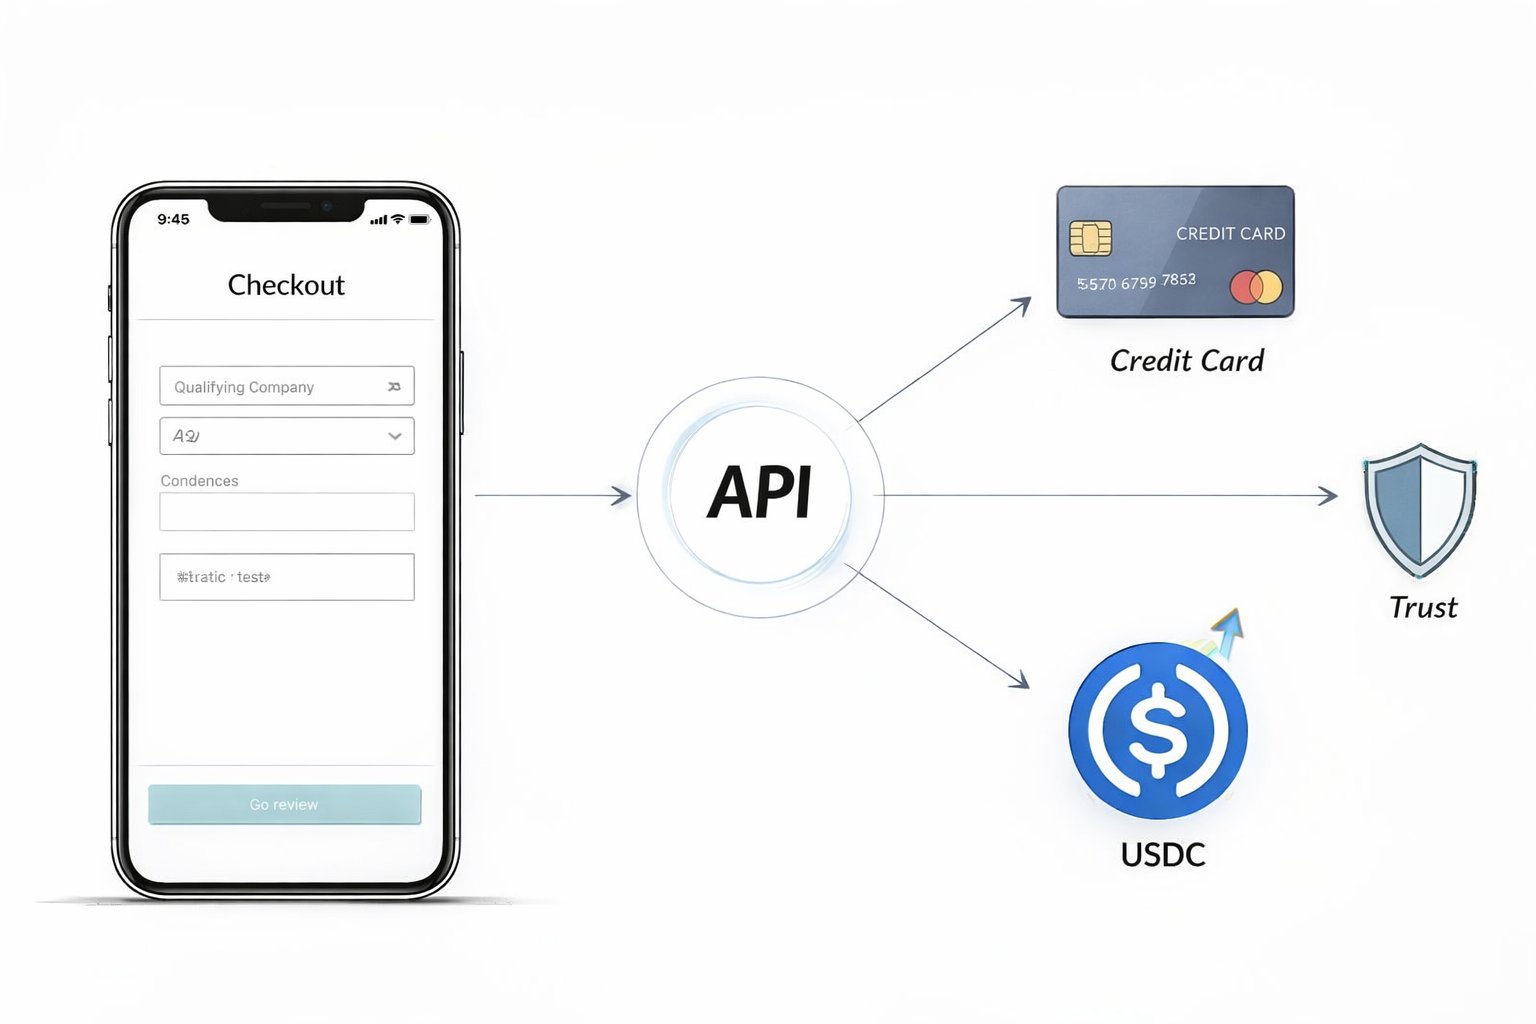
A modern, API-first solution solves this problem by letting you create an embedded checkout experience. It feels completely native to your brand because it is part of your brand's flow. We provide an API that allows any business to accept payments by card or crypto. The real power here is having a unified system that handles both traditional card payments and crypto through a single, clean API.
The beauty is in its simplicity. Your customers get a smooth, secure transaction without ever feeling like they've left your site. On your end, you get a flexible system that can handle anything from one-time purchases to complex subscription models. If you want to get into the weeds on the technical side, a great place to start is https://suby-api.readme.io/reference/introduction.
A strong payment API doesn't just process transactions; it builds the foundation for your entire revenue model. It simplifies global expansion by standardizing how you get paid, no matter where your customers are.
This approach brings some serious advantages, especially for businesses with global ambitions:
Boosted Conversion Rates: Keeping users on your site during checkout builds trust and cuts out the friction that kills sales.
Simplified Operations: Why juggle multiple integrations? Manage card and crypto payments from one dashboard.
Faster, Stable Settlements: Forget the delays, high fees, and headaches of traditional international banking.
At the end of the day, the goal is to make the journey from purchase to payout as smooth as possible. Your customers can pay with a Visa or Mastercard, and you receive the funds quickly and reliably as USDC in your wallet. It's a modern approach to cash flow that prepares your business for real, sustainable growth.
Setting Up Your Integration Environment
Before you can process a single payment, you need to lay the groundwork. This is all about creating a secure and functional development space where you can get your credentials, learn the API's rules, and test everything without touching real money. Think of it as building a solid foundation for your entire payment system.
First things first: you'll need your API keys. You can grab these directly from your dashboard. These keys are what your application uses to prove it's you when it talks to our servers. Without them, your integration is a non-starter.
You'll notice there are two different keys. It is absolutely critical to understand what each one does.
Understanding Public and Secret Keys
Your API keys are like two different ID cards for your application. One is designed to be seen in public, while the other needs to be kept under lock and key.
Public Key: This one is safe for client-side code, like the JavaScript running on your website. Its main job is to identify your account when you're collecting payment details, but it doesn't have the power to do anything sensitive, like actually creating a charge.
Secret Key: This key is for your server-side code and your server-side code only. It has full access to your account and can perform any API request, from creating payments to processing refunds. You must never let this key get into your frontend code or commit it to a public repository.
Treat your secret key like you would a password to your bank account. If it ever leaks, you need to revoke it immediately from your dashboard and generate a new one. This separation is the bedrock of a secure payment gateway API integration.
Your secret key is the master key to your payment operations. Protecting it isn't just a best practice, it's a fundamental security requirement for taking payments online.
Once you have your keys, you’re ready to make your first authenticated API call. Authentication is usually as simple as including your secret key in the request's header.
This command tries to create a charge, authenticating with your secret key. It's the classic "hello world" for a payment integration, and a successful response confirms your environment is talking to the API correctly. As you get deeper, remember that connecting different systems can present unique data integration challenges, so getting this initial connection right is a big win.
The Importance of a Sandbox Environment
You wouldn't test-drive a new engine during a live race, right? The same logic applies here, you should never test your payment code with real money. This is exactly what the sandbox environment is for. It's a perfect replica of the live production environment but uses test data and simulated payments. It is your development playground.
Working in the sandbox is non-negotiable for a few key reasons:
Test Without Risk: You can run through every possible payment outcome, from a successful transaction to a declined card, without a single real dollar changing hands. This is crucial for bulletproofing your error-handling logic.
Simulate Webhooks: It lets you fire off test events like
charge.succeededorsubscription.updatedto confirm your webhook endpoints are correctly receiving and processing these notifications.Build and Refine: The sandbox provides a controlled space to build, test, and polish your integration. You can make mistakes, squash bugs, and perfect the user experience long before your first customer interacts with it.
To get started, you’ll use a separate set of test API keys, which are also available in your dashboard. These keys only work in the test environment, keeping a clean line between your development work and your live operations. A smooth user experience is also critical, and you can learn more about how to create one in our guide on onboarding without requiring a crypto wallet. By getting comfortable in the sandbox, you’re setting yourself up for a reliable, secure, and successful launch.
Building One-Time and Recurring Payments
With your environment configured and authentication sorted, it's time to get to the core of your business: the payment flows. Whether you’re selling individual products or managing monthly memberships, a solid integration needs to handle both one-time charges and recurring subscriptions seamlessly. Let's dig into how you can implement both models.
This diagram gives you a high-level look at the API setup, from securing your keys to getting comfortable in the sandbox.
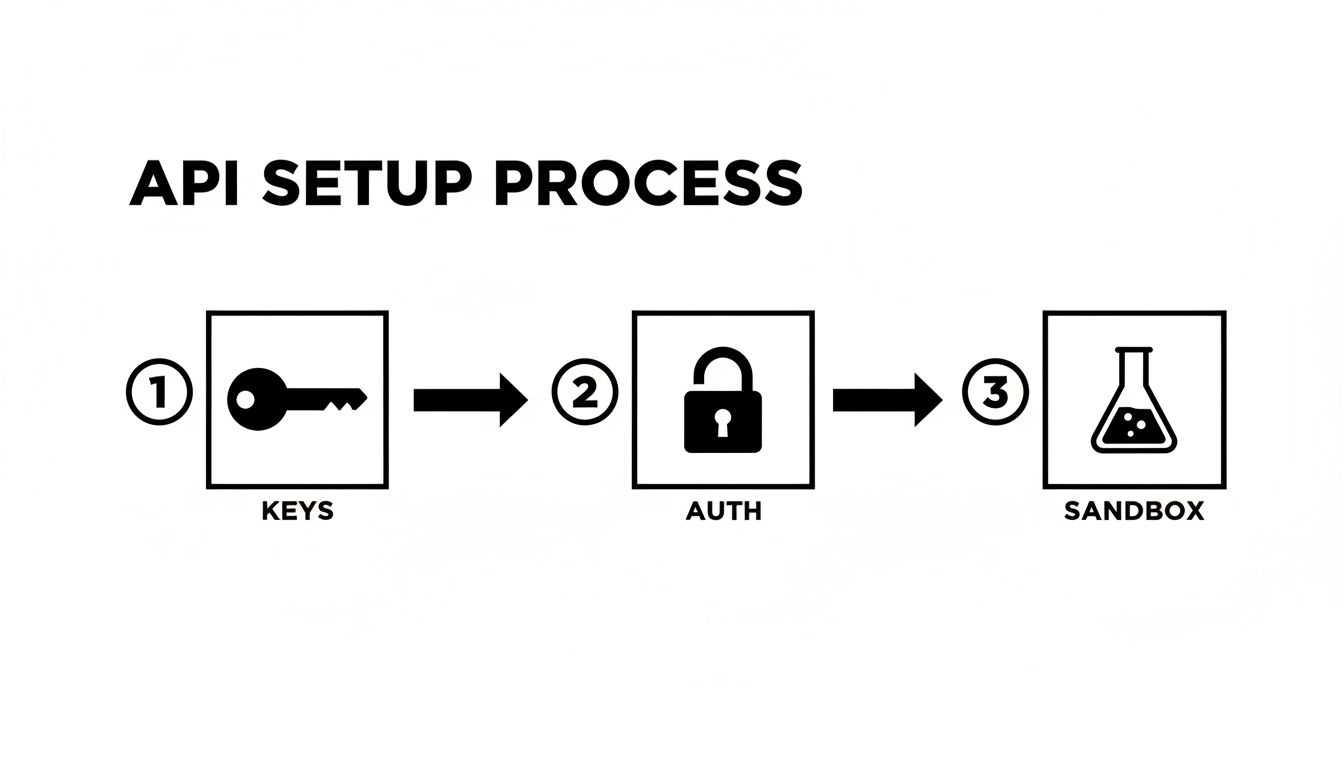
Running through this process ensures you can build and test your payment logic securely before a single live transaction ever takes place.
Creating One-Time Charges
A one-time charge is the bread and butter of most e-commerce. It’s perfect for selling digital downloads, physical goods, or invoicing for a one-off project. The entire process boils down to a secure, two-step dance between your customer's browser (the client) and your application's backend (the server).
Here’s how that flow typically works:
Create a Payment Intent: First, your server makes an API call to create a
PaymentIntent. Think of this object as a formal declaration of the customer's intent to buy, containing key details like the amount and currency. The API responds with a unique client secret.Collect Payment Details: Your server then passes that client secret to your frontend. You'll use this secret to securely render an embedded checkout element where the customer enters their card details. This tokenizes the sensitive information, so it never has to touch your server, which drastically simplifies your compliance burden.
Confirm the Payment: Once the user hits "pay," your frontend confirms the payment with the API. The transaction is processed, and your server gets a webhook notification (more on those later) confirming whether it succeeded or failed.
This client-server model is all about security. It ensures sensitive card data is handled exclusively by a certified partner, leaving your backend to focus on business logic. No matter how the customer pays, the funds settle directly to your wallet as USDC, simplifying your accounting and giving you fast access to your revenue.
Setting Up Recurring Subscriptions
For SaaS platforms, memberships, or any business built on a recurring revenue model, subscriptions are everything. A well-executed integration makes managing the entire subscription lifecycle, from creation to cancellation, feel almost effortless.
Subscriptions aren't just about collecting a payment every month. They're about automating your revenue stream and building a predictable financial foundation for your business.
The subscription journey begins by defining the products and plans you offer.
Products: These are the actual services you sell, like a "Pro Membership" or a "Basic Plan."
Plans: These define the specific pricing and billing interval for a product, such as $29 per month or $299 per year.
Once you've configured your plans (either through the API or your dashboard), you can start signing people up. When a customer subscribes, you create a Customer object and a Subscription object, linking the two. From there, the API takes over, handling the recurring billing automatically. It will attempt to charge the customer's saved payment method at the start of each cycle and will let your system know the outcome via webhooks.
This automated system is incredibly powerful. It manages retries for failed payments, can send renewal reminders, and gives you the tools to programmatically handle upgrades, downgrades, or cancellations. If you want to dive deeper into the financial side of things, check out our guide on pricing strategies for crypto subscriptions.
Expanding Beyond Code with Native Integrations
While a full API integration gives you ultimate control, sometimes you just need a faster, simpler solution. We also offer native integrations with Discord and Telegram. This is where pre-built tools can be a game-changer, connecting the power of the API to real-world business needs without requiring a ton of development work.
For instance, many online communities and creator-led businesses are built on platforms like Discord and Telegram. Our native integrations for both allow you to automate paid access. Just set up a subscription plan, and the integration will automatically assign roles or grant access when a user pays, and just as easily revoke it if their subscription ends.
For other businesses that need a quick way to start selling, you can also use:
Embeddable Checkouts: With just a few lines of code, you can drop a fully functional, conversion-optimized checkout form right onto any website.
Shareable Paylinks: You can generate a unique link for any product or plan. Share it in an email, on social media, or anywhere else to send customers directly to a hosted payment page.
These tools offer real flexibility. You can start with a simple paylink and graduate to a full-blown API integration as your business scales. The important thing is that every single payment, whether from an API call or a paylink, follows the same core principle: customers pay easily, and you receive stable USDC.
Using Webhooks for Real-Time Event Updates
When you're building a payment gateway API integration, relying only on the immediate API response is a bit like hitting refresh on a package tracking page over and over. It works, but it's inefficient and you're always playing catch-up. A truly solid integration needs to be told when things happen, not constantly have to ask. That’s exactly what webhooks are for.
Think of webhooks as a push notification system built for your server. They send automated messages from our system to yours the instant something important happens, a payment clears, a subscription changes, you name it.
By setting up a webhook endpoint (which is just a dedicated URL on your server), you're giving us a direct line to your application. This way, your systems stay perfectly in sync without any manual work or constant API polling.
Setting Up and Securing Your Webhook Endpoint
Getting webhooks running is pretty straightforward. First, you create an endpoint on your server that's ready to accept incoming HTTP POST requests. Then, you just register that URL in your dashboard. Once that’s done, we'll start sending event data in JSON format to your endpoint whenever something happens in your account.
But just opening the door to receive data isn't enough; you have to check who's knocking. You absolutely must secure your endpoint to make sure the notifications are genuinely from us and not a bad actor trying to spoof a payment confirmation. This is where signature verification comes in.
Every single webhook request we send includes a special header with a cryptographic signature. The very first thing your code should do is use your unique webhook signing secret to verify that this signature is legit.
Verifying webhook signatures isn't just a best practice, it's a non-negotiable security step. It protects your system from forged requests, preventing things like fraudulent order fulfillment or unauthorized access to services.
If the signature checks out, you can trust the data and move on to your business logic. If it fails, drop the request immediately. This simple check is your most important line of defense.
Handling Key Webhook Events
Once your secure endpoint is up and running, you can start building logic around the events that matter most to your business. While we send a wide variety of event types, there are a few you'll almost certainly want to handle.
charge.succeeded: This is the big one. It's the definitive confirmation that a customer's payment went through. When you get this, you can confidently ship an order, grant access to a digital product, or update an account to "paid."charge.failed: This event tells you a payment didn't go through. It's your cue to trigger an automated email asking the customer to update their payment details or try another card.subscription.updated: This fires whenever a subscription changes, think upgrades, downgrades, or plan switches. It lets you adjust a user's permissions or feature access on the fly.subscription.deleted: When a customer cancels, this event is your signal. Your system can then use this to schedule the revocation of access at the end of their current billing cycle.
Let's look at a real-world example. Say a customer buys a monthly membership to your Discord community. The moment their card is approved, a charge.succeeded event is sent to your server. Your code first verifies the signature, then sees the payment was for the membership, and instantly calls the Discord API to assign the "Premium Member" role to that user. The entire flow is hands-off, immediate, and reliable.
As the US payment gateways market is forecasted to hit USD 8,828.32 million by 2034, more businesses are turning to solutions that handle these complex workflows. This is a major reason why hosted gateways are so popular, they offload much of the technical heavy lifting, making it easier for merchants to build secure, automated systems. You can find more insights on the US payment gateways market on imarcgroup.com.
By building your core business logic around these real-time webhook events, you create a system that's far more responsive and automated. Your customers get what they paid for instantly, and your team is freed from the grind of manually checking and updating payment statuses.
Managing Payouts and Reconciliation in USDC
This is where things get really interesting and where you'll see a night-and-day difference from the old-school banking world. A solid payment gateway API integration isn't just about how you take money; it is about how you actually get paid. With this model, you can sidestep the multi-day waiting periods, surprise currency conversion fees, and random holds that plague traditional finance.
The entire system is built around a simple, powerful idea: your customer pays with their card, and your business gets paid out quickly and directly in USDC to your connected wallet. This isn't just a small feature, it's a core change in how you manage your cash flow.
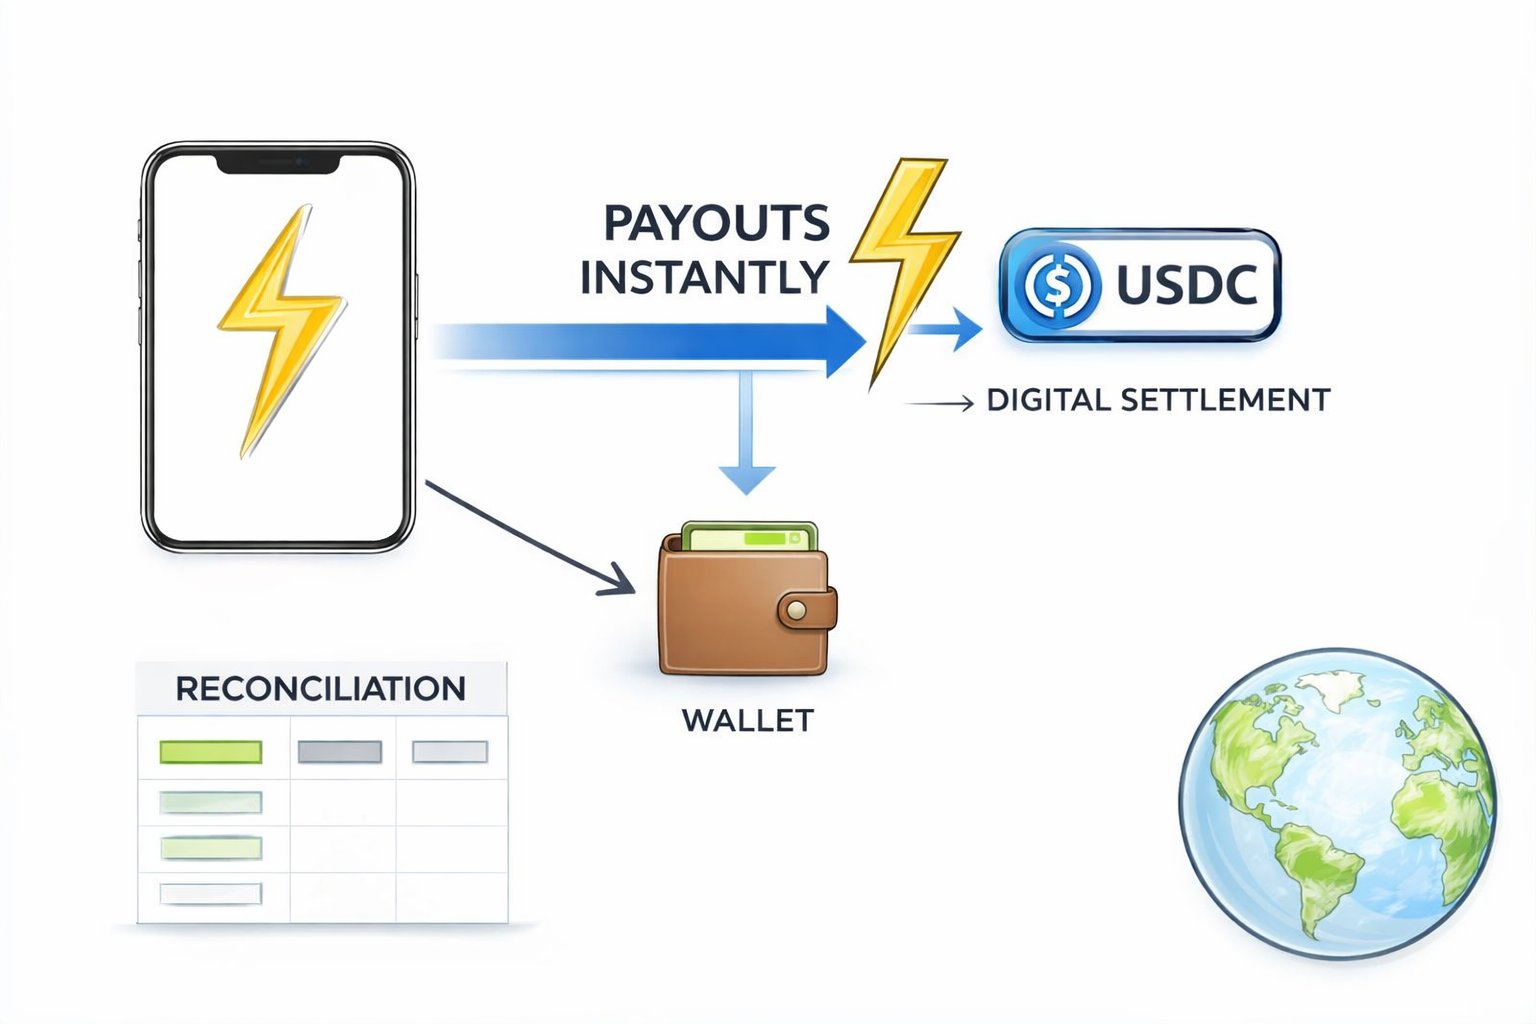
For anyone running an international business, a SaaS platform, or even a freelance operation, this is a huge advantage. It basically vaporizes cross-border friction and gives you a stable, predictable revenue stream you can actually rely on.
The Reconciliation Process
You should never have to guess where your money is. A clean reconciliation process is fundamental to your company's financial health, and our tools are built to give you total transparency from the moment a charge is made to the final USDC payout.
There are two main ways you can stay on top of everything:
Via the API: If you're building out automated accounting workflows, you can hit the API for detailed transaction and payout records. This is perfect for generating custom reports, syncing data with your bookkeeping software like QuickBooks or Xero, and keeping your financial ops running smoothly without manual intervention.
Through the Dashboard: Need a quick, at-a-glance view? The real-time dashboard gives you a clean breakdown of every transaction. You can see payments as they come in, monitor pending settlements, and review a complete history of every single USDC payout that’s hit your wallet.
This two-pronged approach gives you the flexibility to manage your finances in the way that makes the most sense for your business.
The real goal here is to make your global revenue feel as simple and manageable as your local revenue. By settling everything in USDC, we standardize your income and cut out the volatility and delays that come from juggling multiple currencies and banking systems.
Connecting Your Wallet and Viewing Payouts
Getting set up to receive your money is incredibly simple. Your first step is to connect a compatible wallet address inside your dashboard, this is where all your funds will land. Once that's done, the entire payout process is automated.
Here’s how it works: a customer pays, the transaction gets processed, and the funds are settled. You’ll then see the USDC arrive in your wallet, and a corresponding record will pop up in your payout history. Think of that history log as your single source of truth; it shows every batch of transactions that have been bundled, settled, and sent to you.
This fast, transparent process means you can manage a global business with confidence. It delivers the financial clarity you need to make smart decisions, reinvest in growth, and maintain positive cash flow. It's also a game-changer for community managers looking to monetize. For a deeper dive on that, check out our guide on how to accept stablecoin payments on Discord and Telegram.
Prepping for Production: Your Go-Live Checklist
Alright, you've built and tested everything in the sandbox. Now comes the moment of truth: moving to a live production environment. This is the final, most critical step in your integration, and you don't want to rush it. Before you flip that switch, let's walk through a final go-live checklist to make sure everything is secure, compliant, and ready for real customer money. Think of this as your last line of defense.
One of the best parts of using an embedded solution like this is how much it simplifies your compliance burden. Our PCI-DSS Level 1 certified partner handles the sensitive cardholder data, meaning raw card details never even touch your servers. This massively shrinks your PCI scope, which saves a ton of time and resources that you'd otherwise spend on audits and paperwork.
This isn't just about ticking compliance boxes; it's about building a system that actually works. With global online transactions blowing past $8.5 trillion, a failed checkout is a lost sale. Good APIs are the backbone of a successful payment system. In fact, we've seen that tokenized transactions can boost acceptance rates by as much as 11.7% compared to their non-tokenized counterparts. If you're curious about how modern APIs can help you scale without massive engineering overhead, the team at Rapyd has a great write-up.
Locking Down Security and Authentication
First things first, let's get your security production-ready. Your secret API key needs to be stored safely, either as an environment variable or in a proper secrets manager. Whatever you do, never hardcode it directly into your application. That's just asking for trouble.
Next, take a hard look at your webhook endpoint. Is it running on HTTPS? Crucially, have you enabled signature verification? This is non-negotiable. It's how you confirm that the events hitting your server are legitimate and not from some bad actor. This has to be active before you process a single live transaction.
Security isn't a final feature you bolt on at the end. It is the very foundation of a payment system customers will trust. One small oversight here can expose customer data and seriously tarnish your brand.
Final Integration and Test Run
With your security tightened up, it's time for one last round of integration tests. The most common pitfall here is surprisingly simple: forgetting to switch from your test API keys to your live keys. It's an easy mistake to make in the rush to launch, so double-check it now.
Once the live keys are in place, run a full, end-to-end test with a real card. I recommend processing a small, real transaction. This confirms the entire flow is working perfectly, from a customer hitting "pay" all the way through to you seeing the USDC payout land in your connected wallet.
Here’s a practical checklist to run through just before you launch:
API Keys: Have you swapped your test keys for the live production keys?
Webhook Security: Is your endpoint using HTTPS, and is signature verification turned on?
Error Handling: Does your system handle API errors and failed payments gracefully, or does it crash?
Live End-to-End Test: Have you processed a small, real transaction to confirm the entire payment and payout cycle works?
Logging: Are you logging API requests, webhook events, and any potential errors? Good logging will be your best friend when you need to debug something quickly.
Go through these checks methodically. It is the best way to launch your integration with confidence, knowing you’ve built a secure and reliable payment experience that won’t let you or your customers down.
Frequently Asked Questions
Got a few questions? You're not alone. Here are some of the most common things developers ask when they're getting started with a new payment gateway integration.
What’s the Real Advantage of Settling in USDC?
It really boils down to two things: speed and stability. If you've ever dealt with traditional payment systems, you know the drill, settlements can take days, and you're often at the mercy of unpredictable currency conversion fees.
Settling directly to your wallet in USDC changes the game. Your revenue arrives almost instantly as a stable digital currency. This completely sidesteps the usual cross-border banking headaches and gives you immediate access to your funds, which is a massive win for cash flow.
How Can I Juggle Both Card and Crypto Payments?
This is where a modern payment API really shines. You don't have to build two separate systems. Instead, you integrate a single, unified checkout flow that lets customers choose how they want to pay, whether that's with a credit card or a supported cryptocurrency.
Behind the scenes, the API does all the heavy lifting for each payment method. The best part? No matter how the customer pays, you always receive your settlement in USDC. This makes reconciliation on your end incredibly straightforward and consistent.
The whole point is to offer flexibility to your customers without creating a mess for your finance team. You give them choice at checkout, but your business gets a stable, predictable currency every time.
Do I Need to Worry About PCI Compliance?
Thankfully, no. You don't have to take on the full burden of PCI DSS compliance yourself. When you use our API and embedded checkout tools, all the sensitive card data is managed by our PCI-DSS Level 1 certified processing partner.
Your integration never has to touch raw card numbers. This drastically reduces your compliance scope and frees you up to build your product instead of getting bogged down in security audits.
Ready to build a global payment system with fast, stable USDC settlements? With Mintline, you can integrate a flexible payment API, use shareable paylinks, or embed a checkout to accept card and crypto payments worldwide. Get started with Suby today.