
A Discord payment bot is your secret weapon for automating payments and managing member access on your server. It’s what lets you charge for exclusive content or communities, turning your passion project into a real, hands-off business.
Why Bother With a Discord Payment Bot?
Let's be honest: manually tracking payments and assigning roles on Discord is a dead end. It’s a huge time-sink, ripe for human error, and it’s the biggest bottleneck stopping your community from generating reliable income. As your server grows, you'll find yourself buried in an administrative nightmare of chasing payments, confirming transactions, and endlessly tweaking permissions.
A dedicated payment bot is no longer a "nice-to-have," it's essential for any serious creator. It handles the entire grunt work from start to finish, which makes life easier for both you and your members.
Ditch the DMs, Automate Your Revenue
Picture this: a new user wants to join your premium channel. Instead of you manually DMing them payment info, they just use a simple command. The bot instantly generates a secure payment link. Once they pay with their card, the bot verifies it and immediately assigns them the correct role, unlocking the private channels. No waiting, no hassle.
This is what a real automated workflow looks like. The benefits are massive:
- Instant Gratification: Members get immediate access the moment they pay.
- Zero Admin Headaches: Free up your time to actually engage with your community instead of playing accountant.
- Global Payments, Simplified: Accept payments from anywhere in the world without thinking about currency conversion or bank transfers.
- Rock-Solid Security: Payments are processed through a trusted gateway, so you aren't handling sensitive data directly.
This is the kind of professional layer a tool like Suby brings to the table. Our native Discord integration means members can pay with a card, and you get settled instantly in USDC. The same core idea that helps people transform your Facebook Group into a profitable membership business applies here, automating access based on verified payments is the key.
A Thriving Creator Economy
This shift toward automated community monetization isn't just a small trend, it's a huge economic movement. Just look at the numbers. In 2025 alone, Discord's developer monetization tools pulled in an eye-watering $34 million in annual revenue. With over 12 million active bots on the platform, this ecosystem is a true engine for creators.
A Discord payment bot is the bridge between a casual community and a sustainable business. It converts a messy, manual chore into an automated, scalable revenue machine so you can focus on what you do best: building an awesome community.
By setting up a payment bot, you’re not just adding another tool. You're building a professional system to handle all the financial busywork, giving you the freedom to grow a profitable online community with confidence. The rest of this guide will walk you through exactly how to get it done.
Building Your Payment Foundation with Suby
Before we can even think about writing a single line of code for our Discord bot, we need to build the engine that will actually handle the money. This is the foundational work, setting up your payment processor, creating your products, and figuring out how you’ll get paid. We'll be using Suby to get this done, and we've made the process incredibly straightforward, even if you’re not a technical person.
Think of this step as building the cash register for your community business.
Our goal is pretty simple: create a system where your members can pay with a standard credit card, but you receive the funds as USDC directly in your crypto wallet. This setup is a game-changer because it cuts through the red tape of international banking, eliminating those frustrating delays and high fees. Let's get your payment infrastructure set up and ready to go.
Account and Wallet Setup
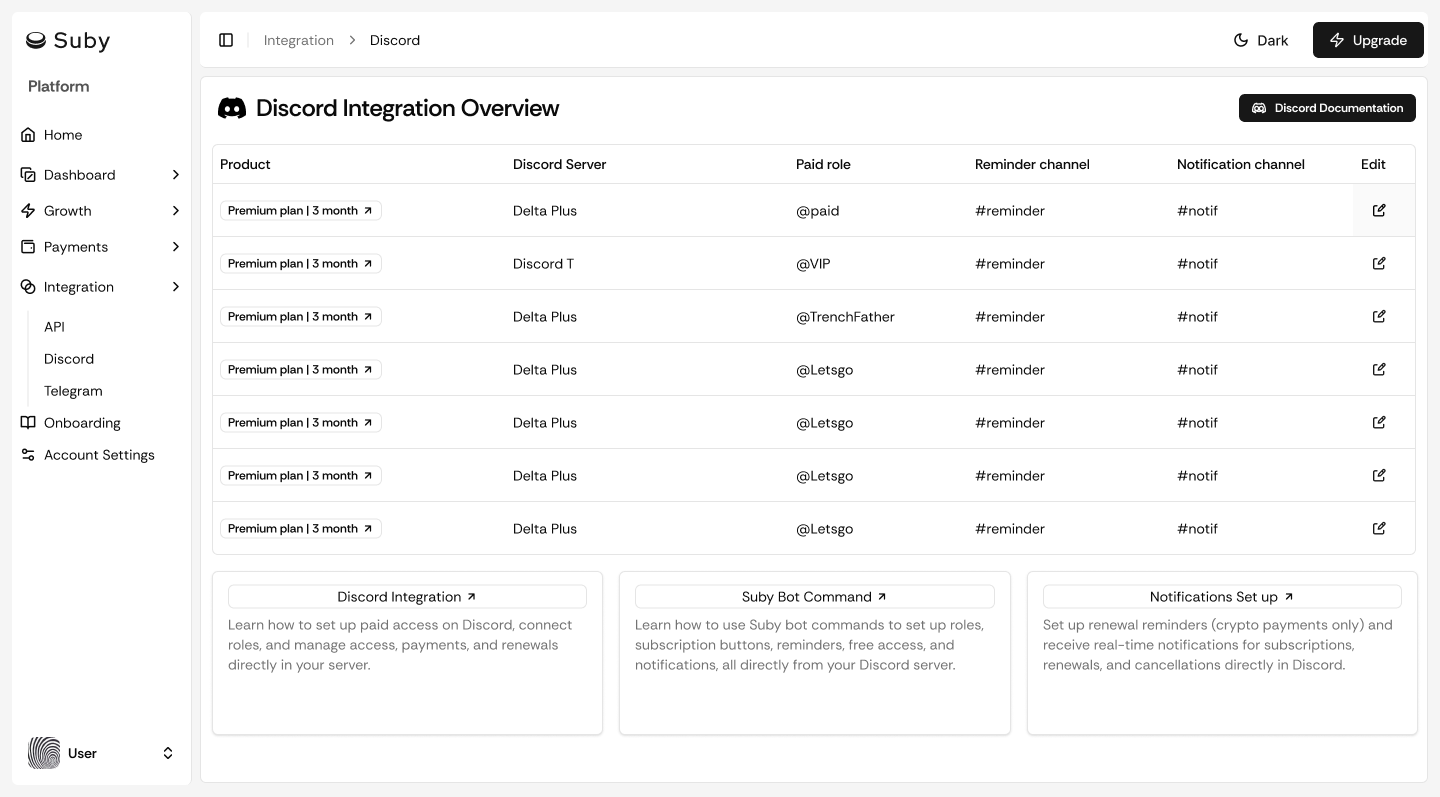
First things first, you need a Suby account. Signing up is quick and gives you access to the merchant dashboard, which will become your mission control for everything payments-related. It’s where you’ll create products, monitor transactions, and keep an eye on your revenue.
Once you're logged in, the single most important action is to connect your crypto wallet. This is crucial because it’s where all your earnings will land. Suby settles every transaction in USDC, which is great for keeping your revenue stable and avoiding crypto market volatility.
You can connect any self-custody wallet that works with a supported network like Polygon or Ethereum. The beauty of this direct-to-wallet approach is that you maintain full custody of your funds from the moment a payment clears. No waiting for bank transfers or dealing with payout holds.
Creating Your First Product and Paylink
With your account and wallet connected, you're ready for the fun part: creating the thing you’ll actually sell. In Suby, this is called a "product," but it can represent anything from a monthly pass to a premium Discord channel to a one-time payment for an ebook.
Inside your Suby dashboard, you’ll define your product with a few key details:
- Product Name: Make it clear and simple for your members, like "Gold Tier Access" or "VIP Membership."
- Price: You'll set this in a familiar currency, such as USD.
- Payment Type: Choose between a one-time purchase or a recurring subscription (monthly, yearly, etc.).
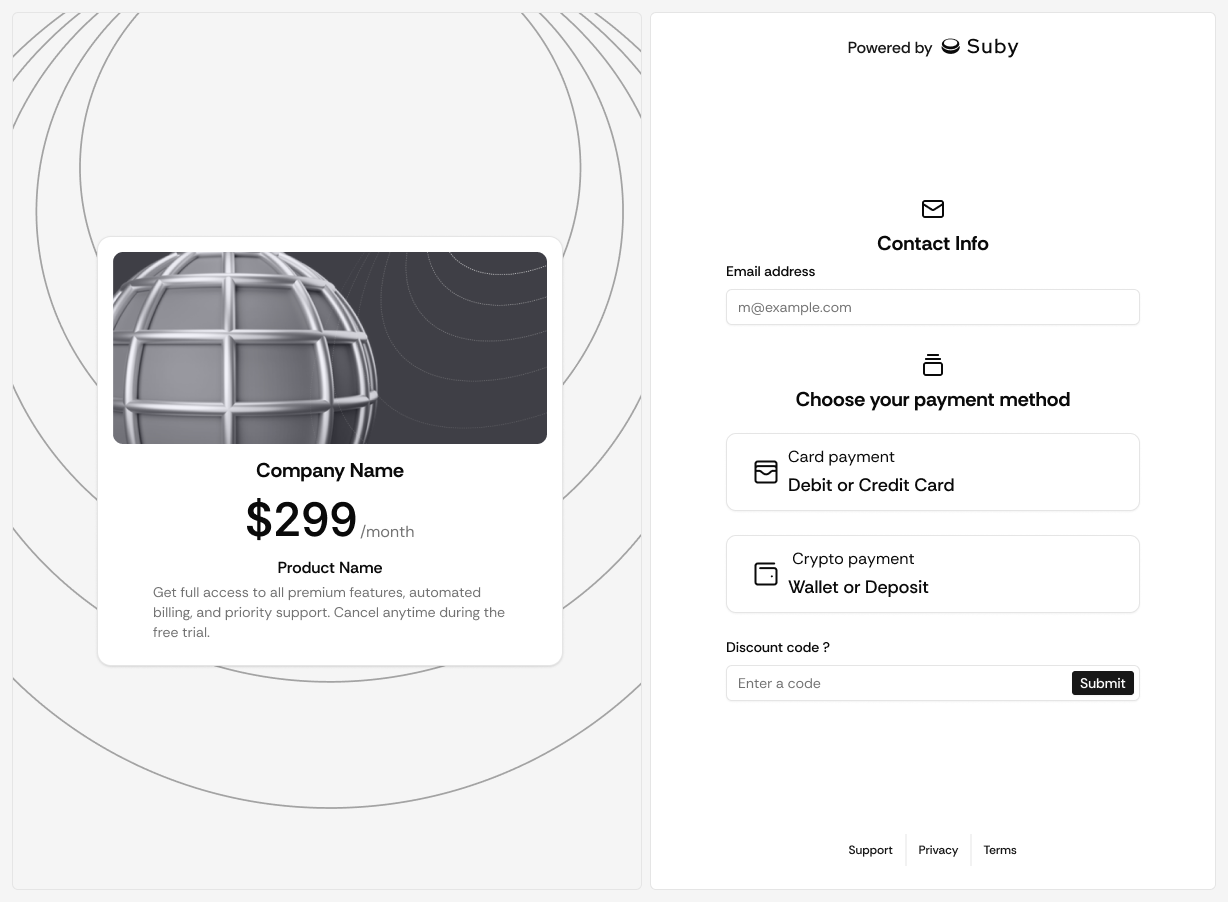
Once you save the product, Suby instantly generates a unique, shareable paylink. This is just a simple URL that leads to a clean, professional checkout page where customers can pay. While you could just post this link in your Discord, we’re going to use it in a much smarter way with our bot to create a fully automated flow.
The paylink is the core of this whole system. It's an instant checkout experience that bridges the gap between a customer's credit card and your USDC wallet. Our bot will essentially just guide users to this link at the right time.
This approach isn't just for starting from scratch. If you've already got a system in place and want to upgrade, you can learn more about how to migrate your existing payments bot to Suby.
The last thing you’ll need from the dashboard is your API key. Head over to the settings area, and you'll find your API credentials. These keys are what will let our Discord bot talk securely to Suby's system to verify payments. Copy these and keep them somewhere safe, we'll need them very soon when we start coding.
And that’s it! With your account created, wallet connected, first product live, and API keys in hand, your payment foundation is officially built. Now we can move on to building the bot.
A powerful Discord payment bot is only half the battle. To really make it work, that bot needs a well-organized server to manage. The way you structure your roles and channels is the backbone of your paid community, it's what defines who gets to see what and shows off the value of a subscription to potential members.
Honestly, before you even write a single line of code for your bot, you need a solid blueprint for your server. The goal is to create a clear, intuitive path that guides a new member from a public welcome area to a premium, subscriber-only space. This setup doesn't just make your tiers easy to understand, it's what allows the automation to work flawlessly later.
Designing Your Roles and Tiers
I like to think of Discord roles as keys that unlock specific doors on your server. Each payment tier you create in Suby should map directly to a unique role. This one-to-one relationship is absolutely crucial for the payment bot to do its job.
For instance, if you're planning on two membership levels, you'd create corresponding roles:
- Bronze Member: Gets access to a specific set of exclusive channels.
- Gold Member: Gets access to everything Bronze members have, plus some extra, higher-value channels.
Keep the role names simple and descriptive. A member should be able to look at the role and know exactly what it means. When your bot automatically assigns "Gold Member" after a successful payment, there should be zero confusion about the new perks they just unlocked.
Building Your Channel Layout
Once your roles are defined, it’s time to build the "rooms" of your community, the channels. A smart channel structure is what separates your free, public content from the premium stuff, creating a natural funnel that nudges people to subscribe.
Let's imagine you're running an exclusive coaching group. A great way to set this up is with a three-part structure:
- Public Welcome Area: Think of this as your lobby. Channels like
#welcome,#rules, and#announcementsare open to everyone. This is where you greet new arrivals, lay down the law, and, most importantly, post instructions on how to subscribe. - Subscriber-Only Channels: These are the private channels that only paying members can see. For our coaching group example, this might include
#premium-content,#live-sessions, and a general#member-chat. - Tier-Specific Channels: If you have multiple tiers, create channels that are exclusive to your highest-paying members. For example, a
#private-qachannel could be restricted to "Gold Members" only, giving them a special perk like direct access to you.
This tiered channel layout creates a visible value ladder. Non-subscribers can see the locked channels, they know something valuable is behind that little padlock icon, which sparks curiosity and gives them a very tangible reason to upgrade. The more organized you are here, the more attractive your paid offerings will be.
Here is a quick template I often use when planning a new server's structure. It helps visualize how different roles get access to specific parts of the community.
Example Discord Role and Channel Structure
This kind of table really clarifies your thinking and ensures every channel has a purpose and every role has clear benefits.
The bot economy on Discord is massive and shows no signs of slowing down. By 2025, the platform's bot marketplace had exploded to over 55,000 listings, with bot-driven messages accounting for a staggering 28% of all traffic. You're tapping into a proven ecosystem where creators are making real money. I know one server with 62,000 members that converts 5% of them to a $7/month plan, that’s over $22,000 in monthly revenue. You can find more success stories and insights on building a revenue engine from your community over at Marketing Agent.
By putting this much thought into your server structure, you’re doing more than just organizing content. You're designing the entire user experience for your paid membership. This is the foundation that connects your Suby payment system directly to your Discord community.
With this framework solidly in place, you’re finally ready to build the bot that will pull it all together. The roles and channels you’ve just mapped out are the very things your bot will manage, granting and revoking access instantly based on real-time payments.
Building Your Bot to Handle Payments and Roles
Alright, you've laid the groundwork with a solid server structure and have your Suby account ready to go. Now for the fun part: bringing your Discord payment bot to life. This is where we’ll connect all the pieces and get into the code, but I’ll walk you through it logically.
The real magic here comes from combining the Discord API with Suby's webhooks. Think of your bot as the middleman. It listens for commands from your members, gives them a unique payment link, and then waits for a confirmation from Suby to automatically grant them their new roles. It's a beautifully smooth and automated process.
Creating Your Bot in the Discord Developer Portal
First things first, you need to tell Discord your bot exists. You’ll do this in the Discord Developer Portal, which is basically the control panel for any app that interacts with Discord. You'll create a new application, give it a name, and then add a "Bot" to it.
This process gives you the most important secret you'll handle: your bot token.
Heads up: Treat your bot token like the master key to your house. Never, ever share it publicly or accidentally commit it to a GitHub repository. If someone gets this token, they can control your bot and wreak havoc on your server.
Once the bot user is set up, you need to give it the right permissions. The non-negotiable one for our purpose is "Manage Roles," since that's how the bot will actually assign roles to your members. After setting permissions, you'll generate an invitation link to add the bot to your server.
Listening for Commands and Generating Paylinks
Time to write some code. I’m a big fan of discord.js, a powerful JavaScript library that makes building Discord bots much easier. The first thing your bot needs to do is listen for a specific command from a user, like /subscribe.
When a member types that command, your bot needs to jump into action. Its main job at this point is to generate a unique Suby paylink just for that person. Using the API credentials you saved earlier, your bot's backend will make a quick call to the Suby API.
This API call creates a checkout session for the product you’re selling (e.g., "Gold Tier Access"). Suby then sends back a unique URL. Your bot should then send this URL to the user in a private message, you definitely don't want payment links floating around in public channels.
Here’s a simplified snippet to show you what that logic looks like in practice:
// This is a simplified example using discord.js

// Listen for a slash command like /subscribe
client.on('interactionCreate', async interaction => {
  if (!interaction.isCommand() || interaction.commandName !== 'subscribe') return;

  try {
    // Generate a unique payment link via Suby's API
    // This would involve an API call to your backend, which then calls Suby
    const paymentLink = await createSubyCheckoutLink(interaction.user.id);

    // Send the link to the user in a direct message
    await interaction.user.send(
      `Here is your personal link to subscribe: ${paymentLink}`
    );

    // Confirm to the user in the channel that a DM was sent
    await interaction.reply({
      content: 'I have sent you a private message with your subscription link!',
      ephemeral: true
    });
  } catch (error) {
    console.error('Failed to generate payment link:', error);
    await interaction.reply({
      content: 'Something went wrong. Please try again later.',
      ephemeral: true
    });
  }
});
This simple interaction kicks off the entire automated journey. The user showed interest, and your bot instantly delivered the next step. No waiting, no manual DMs from you.
Handling Incoming Webhooks for Role Automation
This is the most critical part of the entire setup: handling the webhook from Suby. A webhook is just an automated notification one app sends to another when something happens. In our world, that "something" is a successful payment.
The moment a user pays, Suby sends a notification to a specific URL you provide. This message, known as a "webhook payload," contains all the transaction details, including who paid and what they bought.
Your bot's server needs to be listening for these webhooks, validate them, and then act. This is what makes automatic role assignment possible.
Here's the step-by-step flow:
- Receive Webhook: Your bot's server gets a POST request from Suby.
- Verify Signature: First, you must verify the webhook's signature to prove it really came from Suby. This is a crucial security step to stop bad actors from giving themselves free roles.
- Parse Data: Once you know it's legit, you pull out the user's Discord ID and the product they bought from the payload.
- Assign Role: With that info, your bot finds the user in your Discord server and gives them the correct role (e.g., "Gold Member").
This diagram illustrates how you might structure your server to support this kind of tiered access, where roles unlock new channels.
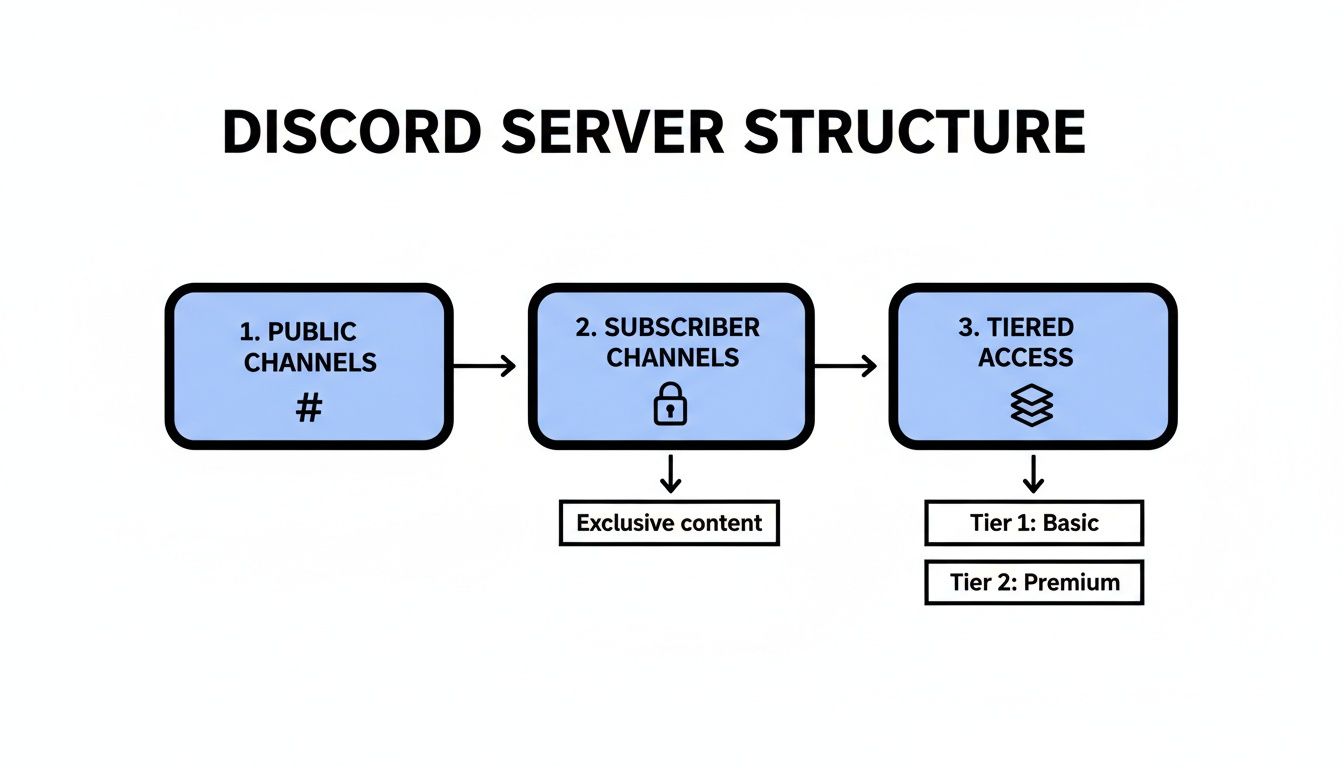
As you can see, a user starts in a public area, and upon payment, the bot automatically grants them a role that unlocks the exclusive subscriber-only sections.
Managing the Full Member Lifecycle
A truly great Discord payment bot doesn't just open the door, it also closes it when the time comes. It needs to manage the entire subscription lifecycle, which includes handling cancellations and expirations.
Just as Suby sends a checkout.completed webhook, it also sends notifications for events like subscription.canceled or subscription.ended. Your webhook handler needs to be smart enough to process these, too.
When your bot gets a webhook saying a subscription is over, the logic just flips:
- It identifies the user from the webhook.
- It finds that user in your Discord server.
- It removes their premium role, instantly revoking access to the paid channels.
This automated de-provisioning is just as important as granting access in the first place. It keeps your community fair, prevents people from lingering after they stop paying, and protects the value of your membership. If you want to dive deeper into this, we've covered some best practices in our guide on advanced role management for Discord security.
By building your bot to handle both the start and end of the member journey, you create a system that truly runs itself. This frees you up from tedious admin work so you can focus on what you do best: creating amazing content for your community.
Fine-Tuning Your Bot and Locking Down Security
So, you've got the core payment flow working. Your Discord payment bot can now process subscriptions and automatically assign roles. That's a huge win. But to move from a functional proof-of-concept to a professional, trustworthy service, we need to add some polish and tighten up security.
This is where your bot truly comes to life. We’ll look at a few key enhancements that make the user experience much smoother. More importantly, we'll dive into the essential security practices that protect your server, your members, and your reputation.
Elevating the User Experience
A truly great bot should feel like a natural part of the community, not a clunky third-party tool. A couple of thoughtful features can make a world of difference.
One of the most valuable additions is a simple /status command. This lets a member check their current subscription details on demand. The bot can then send a private message confirming their active tier and the next renewal date. It's a small touch that empowers your users and dramatically cuts down on the manual "Am I still subscribed?" support tickets you'll have to answer.
Another fantastic enhancement is a custom welcome message for new subscribers. As soon as your bot assigns a premium role, have it send a personalized DM. This is your chance to welcome them to the club, point them toward the exclusive channels they just unlocked, and maybe even share a quick-start guide. It transforms a cold transaction into a warm, human welcome.
Securing Your Bot and API Keys
Now for the non-negotiable part: security. An insecure bot is a massive liability. It’s a backdoor that can be used to grant free access, spam your server, or worse. Protecting your digital assets is paramount.
Your bot token and Suby API keys are the keys to the kingdom. You should never hard-code them into your script or, even worse, commit them to a public GitHub repository. The industry-standard practice is to use environment variables.
Environment variables allow you to store these sensitive secrets completely separate from your application code. Your bot reads them from the server's environment at runtime. This separation is critical for security and also simplifies managing different keys for your development, testing, and live production environments.
A few ground rules for managing secrets:
- Never commit API keys, tokens, or other secrets to version control (like Git).
- For local development, use a
.envfile to store your secrets. - Crucially, add
.envto your.gitignorefile to prevent it from ever being uploaded. - On a production server, use the hosting platform's built-in system for managing environment variables.
Validating Webhook Signatures
When your server gets a webhook notification from Suby, how can you be certain it’s authentic? Without verification, a bad actor could send fake requests to your endpoint, tricking your bot into assigning premium roles for free. This is exactly what webhook signature validation is designed to prevent.
Every webhook Suby sends includes a unique signature in its headers, generated using your secret webhook key. Your code must use that same secret key to calculate its own signature based on the incoming request. If your calculated signature matches the one Suby sent, you know the request is legitimate.
Verifying webhook signatures isn't optional, it's an absolute must. This is your primary defense against fraudulent requests, ensuring roles are only granted after a legitimate, verified payment.
This validation should be the very first thing your webhook handler does. If the signatures don't match, your server should immediately reject the request and log the security event.
Implementing Rate Limiting
Rate limiting is another core security measure that prevents abuse and protects your resources. It simply restricts how many times a user can run a command or make a request within a specific timeframe.
Imagine a user spamming the /subscribe command. Without rate limiting, they could force your bot to make hundreds of API calls, potentially overwhelming your server or hitting API limits. A simple rule, like allowing only one /subscribe command per user every 60 seconds, is usually enough to stop this.
Most modern Discord bot libraries, including discord.js, have built-in tools or well-supported plugins that make implementing rate limiting a breeze. It's a small effort that safeguards your bot’s performance and stability.
While Suby’s infrastructure is fully PCI-DSS compliant, it's your responsibility to secure your side of the integration. You can learn more by reading our guide on what PCI-DSS compliance means for your business. For a more comprehensive overview of data security standards, this PCI DSS Compliance Checklist from Wonderment Apps is an excellent resource.
Frequently Asked Questions
Jumping into building a custom Discord payment bot might feel like a huge undertaking, but it's probably more straightforward than you imagine. Let's walk through some of the questions that pop up most often when creators and community managers start thinking about automating their monetization.
What Payment Methods Can My Members Use?
Your members get a checkout experience that feels familiar and gives them options. We designed Suby to make payments simple, no matter where your community is based. They can pay with:
- Credit or Debit Cards: Standard options like Visa and Mastercard are fully supported, giving everyone a reliable way to pay.
- Cryptocurrency: For those who prefer it, payments can also be made with a variety of popular digital currencies.
The big idea here is choice. Whether someone prefers using their card or paying with crypto, the experience is seamless. For you, the business owner, it’s even simpler. Every payment, regardless of the source, settles as USDC directly into your wallet. This takes the headache out of accounting and shields you from price volatility.
How Much Does It Cost to Run a Discord Payment Bot?
When you're building a custom bot that plugs into a payment API, there are a couple of costs to keep in mind. First, you'll need somewhere to run your bot's code. This is usually cheap, many cloud providers have free or very low-cost plans that are more than powerful enough for a community bot.
Then, you have the payment processing fees. Our pricing is completely transparent, starting at 5% per transaction with zero hidden charges. This single fee covers everything: card processing, currency conversions, and final settlement. You won't find any monthly fees, setup costs, or extra charges for things like refunds.
This all-in-one approach means your costs grow right alongside your revenue. You only pay when you actually earn money, which is ideal for communities just starting out or those with fluctuating membership.
Do I Need to Be an Expert Coder to Build This?
Not at all. You definitely don't need to be a coding wizard to get this done. While this guide gives you code snippets and walks through the technical steps, the core logic is surprisingly simple. If you've tinkered with JavaScript before and are comfortable following a tutorial, you can absolutely build a working Discord payment bot.
Fantastic libraries like discord.js do most of the heavy lifting for the Discord side of things. On our end, we built the API to be as straightforward and well-documented as possible. Really, it all boils down to three main tasks:
- Creating a payment link with a single API call.
- Listening for an automatic webhook message that tells you a payment was successful.
- Using the Discord API to grant the member their new role.
If you can get your head around those three steps, you have all the skills you need. The rest is just about connecting the pieces, and that's exactly what this guide is here to help you do.
Ready to turn your community into a thriving business? Suby gives you the complete payment toolkit, from a powerful API to native integrations with Discord and Telegram, to start accepting card and crypto payments today. Your customers pay how they want, and you get paid instantly in USDC. Get started over at https://suby.fi.