

Stripe usage-based billing lets you charge customers for exactly what they use, much like a utility company bills for electricity or water. Instead of a flat monthly fee, the price tag is tied directly to consumption. This approach has become a go-to for modern software, AI, and API companies because it aligns the cost of their service with the value a customer actually gets.
Why Usage-Based Billing Is Winning
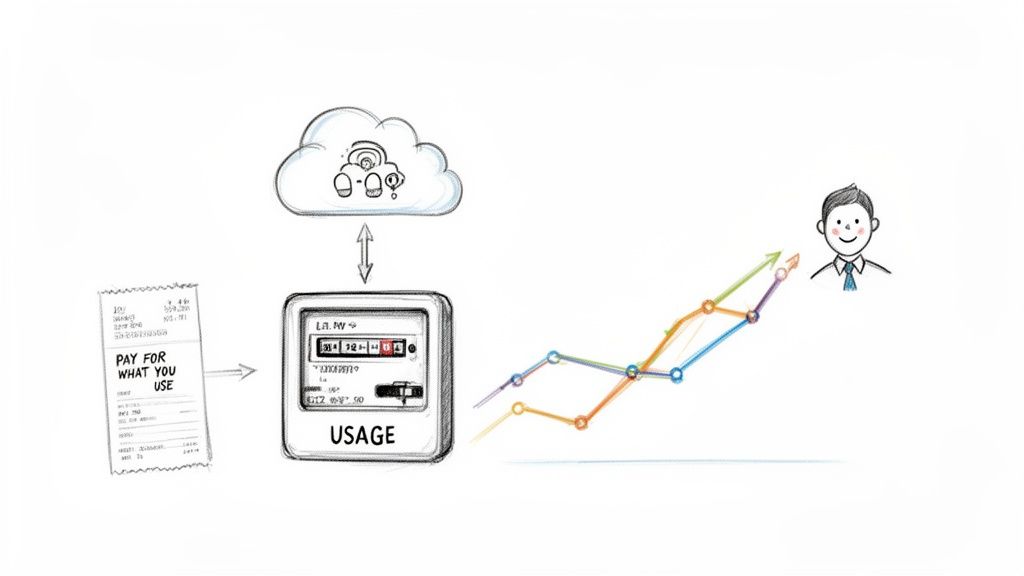
The old one-size-fits-all subscription model is losing ground to more dynamic, consumption-based pricing. The core idea is simple and fair: you only pay for what you actually use. Customers love this transparency, and businesses are flocking to it as a better way to connect their pricing to the value they deliver.
This model is a game-changer for businesses with variable costs, such as:
- API Companies: Charging per API call or for the amount of data processed.
- AI Services: Billing based on tokens consumed or the compute time used.
- Cloud Storage Providers: Charging customers for the gigabytes they store each month.
- SaaS Platforms: Billing for the number of active users or specific actions taken within the app.
The Shift in Market Demand
The move toward usage-based models isn't just a fleeting trend, it signals a fundamental change in how software is bought and sold. A quick look at the SaaS industry tells the whole story. Between 2018 and 2022, the percentage of SaaS companies using this model nearly doubled, jumping from just 27% to 46%. This explosion in adoption shows that customers want pricing that scales with them.
Of course, this created a huge need for billing infrastructure that could reliably track millions of tiny events and turn them into accurate invoices. Platforms like Stripe invested heavily to build systems that could handle this complexity, which in turn made Stripe usage-based billing a popular choice for developers across the industry.
It's a true win-win. Customers get total transparency and control over what they spend. Meanwhile, businesses can capture revenue that grows right alongside their customers' success, breaking free from rigid pricing tiers that never seem to be the right fit.
Simplifying Global Payouts
While getting the billing right is one half of the equation, what you do with the revenue is the other, especially if you operate globally. Traditional payment systems are often tangled up with currency conversions, steep FX fees, and payout schedules you can’t predict. Thankfully, modern payment layers offer a much cleaner path.
For example, our API lets you accept standard card payments from customers anywhere, but settles all of your revenue directly in USDC. Your customers pay with their card like they always do, but your business receives stablecoin payouts, sidestepping the usual cross-border headaches. We also offer native integrations for Discord and Telegram, which is perfect for businesses monetizing online communities.
While this guide is focused on the mechanics of billing, it helps to know how processing fees can chip away at your profits. You might find our breakdown of what are Stripe fees useful.
Understanding Stripe's Metered Billing Components
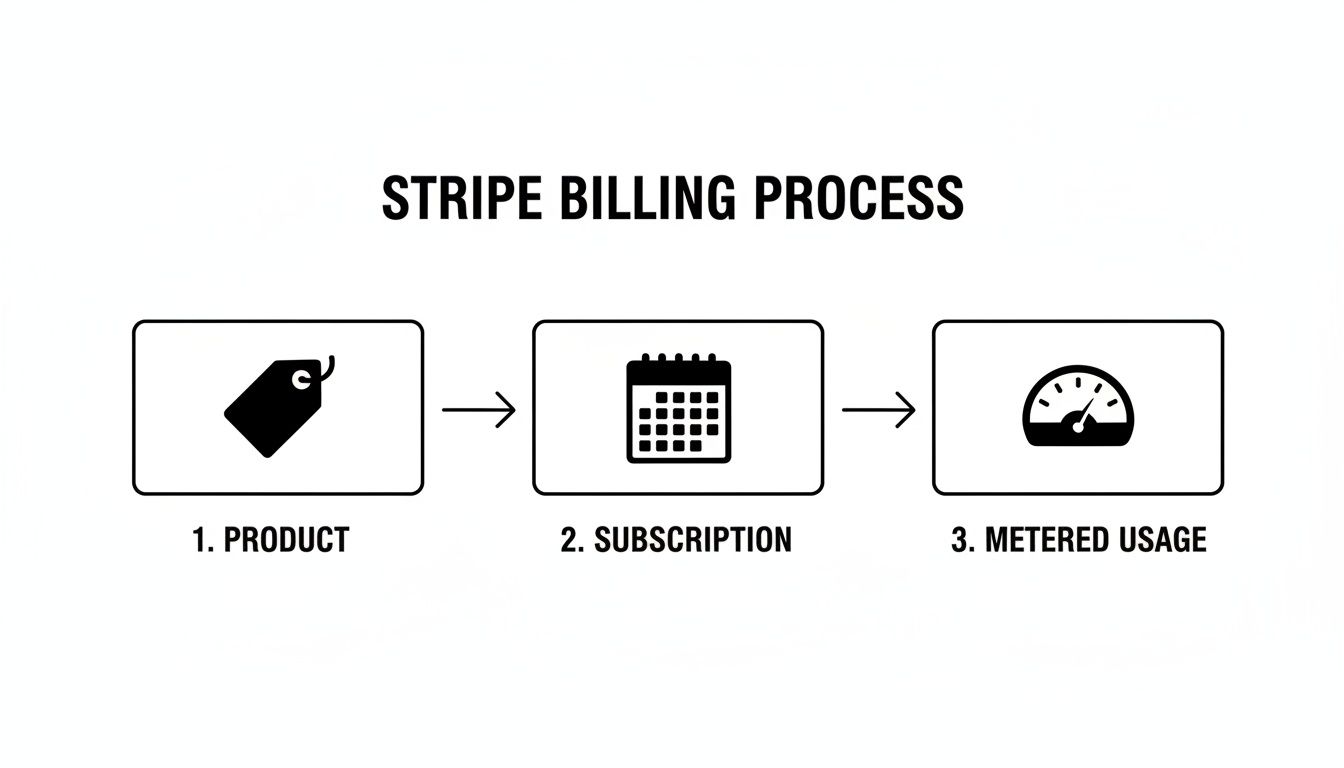
To get started with usage-based billing in Stripe, you first need to get a handle on its core building blocks. Think of them as individual Lego pieces. Each piece has a specific job, and they all snap together to create a flexible and complete billing system. Nailing these fundamentals is the key to building a reliable setup.
It all starts with a Product. This is simply what you're selling, it’s a high-level representation of your service. For example, a Product could be "Cloud Storage" or "API Access." At this stage, it's just a container with a name and description, no price tag attached yet.
Next comes the Price. This is where the money comes in. A single Product can have many different Prices. For instance, your "Cloud Storage" Product might have a flat-rate Price for a basic plan and a separate, metered Price for any storage that goes over the limit. No matter which billing model you choose, clear pricing is essential. Thinking in terms of a rate card can really help you structure your metered tiers in a way that makes sense to customers.
Creating a Metered Price
The secret sauce for usage-based billing is creating a metered Price. This special type of Price tells Stripe to hold off on charging a fixed amount. Instead, it waits for you to report usage throughout the billing cycle and then calculates the final cost.
You can set up a metered Price in a couple of common ways:
- Per-Unit Pricing: This is the most straightforward approach. You charge a simple, flat amount for every unit a customer uses. A classic example is charging $0.01 per 1,000 API calls.
- Tiered Pricing: This is perfect for offering volume discounts as usage grows. You might offer the first 10,000 API calls for free, charge $0.01 each for the next 90,000, and then drop the price to $0.005 each for any calls beyond that.
When you create a metered Price, you're essentially setting up a virtual meter that will automatically track consumption for any customer subscribed to that plan.
A metered price is the heart of any Stripe usage-based billing setup. It connects a sellable product to a flexible, consumption-based cost structure, allowing the final invoice to perfectly reflect the value a customer received.
Connecting a Customer with a Subscription
So, you have your Product and a metered Price ready to go. Now what? You need to connect them to a customer, and you do that with a Subscription. The Subscription object is what ties a specific customer to one or more of your prices.
Inside every Subscription, you'll find Subscription Items. Each item on the subscription points to a specific Price. This is where the real power lies. A customer can have a single Subscription that includes a base flat-fee item (like $20/month for platform access) and a separate metered item for their API usage.
This structure gives you tremendous flexibility. You can mix and match fixed and variable pricing for the same customer, all managed under one unified Subscription. At the end of the billing period, the customer gets a single, clean invoice that details both their recurring fees and their metered usage charges. While this model is powerful, managing global payouts can get complicated. We offer an API that simplifies this by letting you accept card payments while your business receives all payouts in USDC.
Reporting Usage Accurately with the Stripe API
Alright, you’ve set up your products and your customers are subscribed. Now for the most important part of making any usage-based billing model actually work: telling Stripe what your customers are using. This is where the rubber meets the road. Your system needs to report every bit of consumption so Stripe can tally it up and create an accurate invoice at the end of the billing cycle.
The entire process hinges on one key API endpoint: subscription_items.create_usage_record. Think of this as your direct line to Stripe's billing engine. Every time a customer triggers a billable event, whether that's an API call, a gigabyte of storage, or a transcribed minute of audio, you send a usage record. These records are the fundamental building blocks of the final bill.
Sending Usage Data to Stripe
Each usage record you fire off to Stripe needs two key pieces of information: the quantity and the timestamp. The quantity is simply how much was used, and the timestamp is when it was used. It's really important to report usage as close to real-time as possible. If you wait too long or batch things up too much, you risk data loss if something goes wrong on your end.
Thankfully, Stripe is built for this kind of firehose. Their usage-based billing infrastructure was recently beefed up to handle a staggering 100,000 events per second for a single business, with P95 latency clocking in under 30 seconds for critical operations. This means you can get super granular with your usage reporting without ever worrying about overwhelming their systems. It's a testament to how seriously they take scalability.
This diagram gives you a bird's-eye view of how all the pieces fit together, from the initial product setup to the continuous stream of usage data.
As you can see, it's a logical flow: define the product and its metered price, subscribe a customer, and then just keep feeding Stripe the usage data as it happens.
Choosing the Right Aggregation Mode
Now, how does Stripe actually add up all those little usage records you're sending? That's controlled by the aggregation mode, a setting you choose on the metered price object itself. This is a crucial decision, and getting it wrong can lead to some seriously unhappy customers.
You have two main options:
sum: This mode is straightforward, it just adds up thequantityof every single usage record you send during the billing period. This is perfect for things that accumulate, like the total number of API calls or text messages sent.last_during_period: This mode takes a "what's the latest" approach. It completely ignores all previous records in the billing period and only considers thequantityof the final record sent. This is the go-to for billing based on a specific state in time, like how many active users a customer has or how much data they're storing on the last day of the month.
Choosing the wrong aggregation mode is one of the most common pitfalls. For instance, if you bill for storage but set the mode to
sum, you'd be charging for every single gigabyte ever stored throughout the month, not just the final amount. That's a surefire way to get an angry email about a wildly inflated bill.
Preventing Double Billing with Idempotency
When your system is sending thousands, or even millions, of usage records, things are bound to go wrong. A network blip, a server timeout, it happens. So what happens if your system retries a request and accidentally sends the same usage record twice? Without a safety net, you've just double-billed your customer.
This is exactly what idempotency keys are for. An idempotency key is just a unique string you create and include in your API request header. If Stripe sees a request with a key it has already processed, it won't run the logic again. Instead, it just sends back the original response. It’s a lifesaver.
Here’s a simple best practice to follow:
- Whenever a billable event occurs in your system, generate a unique ID for it.
- Use that unique ID as the idempotency key when you report the usage record to Stripe.
- Now, if you hit a network error and need to retry the request, you can safely resend it with the exact same key, confident that you won't create a duplicate charge.
Getting your usage reporting right is half the battle, but you also need a reliable way to test everything. To make that part easier, take a look at our complete guide on using Stripe test cards to simulate various payment flows and billing scenarios without touching real money.
Automating Invoicing with Stripe Webhooks
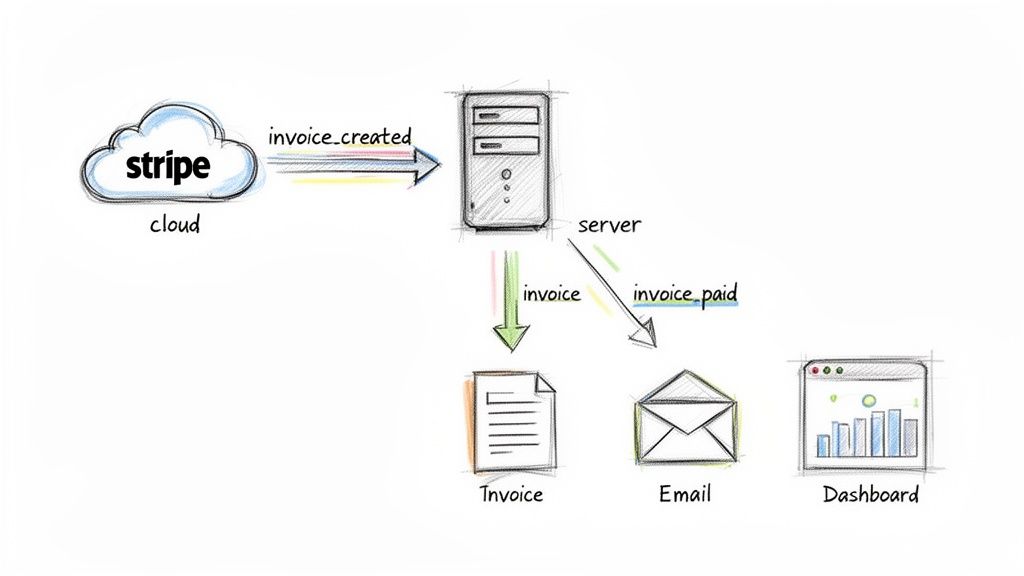
Once you've diligently reported your customer's usage, the next step is pretty important: getting paid. With a Stripe usage-based billing model, this part is mostly hands-off. Stripe automatically totals up all the usage you've reported at the end of each billing cycle, calculates the final bill, and issues an invoice.
This automation is the real magic of the system, but your own application can't just sit on the sidelines. How does your customer know an invoice is ready? And how does your app know when that invoice has been paid? The answer is webhooks.
Listening for Billing Events
Think of webhooks as automated notifications that Stripe sends to your application. Instead of your server constantly polling Stripe to ask, "Is anything new? How about now?", Stripe just tells you when something important happens. This event-driven approach is far more efficient.
For any typical subscription, there are a few key moments, or events, you'll absolutely want to pay attention to:
invoice.created: This event fires the moment a new invoice is created, even before Stripe tries to charge the customer. It's your first opportunity to look it over, and it's a great trigger for internal alerts or last-minute checks.invoice.finalized: Once an invoice is finalized, it can’t be changed. This event is a solid signal that the invoice is officially ready for payment.invoice.payment_succeeded: This is the big one. It confirms the payment went through successfully. This is your cue to unlock features, top up credits, and send that "thank you" email.invoice.payment_failed: On the flip side, this event tells you a payment attempt didn't work. This is when you should notify the customer about the problem and kick off any dunning processes to recover the failed payment.
Automating your billing cycle with webhooks is a massive boost to your operational efficiency. You can find more actionable workflow automation examples to see how this concept applies across other parts of your business.
Designing Your Webhook Handler
Building a reliable webhook handler is absolutely critical. You’re creating an event-driven system, and your server needs to be ready to catch these events from Stripe, confirm they're legitimate, and then kick off the right actions on your end.
A well-designed webhook architecture ensures your application stays perfectly in sync with the customer's billing status. When a payment succeeds, your system should instantly reflect that by updating the UI, sending a confirmation, and granting access without any manual intervention.
So, what does a typical workflow for handling an invoice.payment_succeeded event look like?
- Receive the Webhook: Stripe sends a POST request to a special URL endpoint you've set up on your server.
- Verify the Signature: Your first and most important job is to verify the request's signature. This confirms the message is actually from Stripe and not a bad actor trying to spoof events.
- Process the Event: Once you know it's legit, you can parse the event's data. You’ll get the entire invoice object, which includes the customer ID and subscription details you need.
- Update Your Database: Use the customer ID from the event to find the user in your own database. Now you can update their status, maybe extend their access for another month or simply mark their account as "paid."
- Trigger Downstream Actions: Finally, kick off other business processes. Send a confirmation email, update the customer’s dashboard to show a successful payment, and make sure all their features are active.
While Stripe handles all the complex billing logic, you can actually simplify how you receive the funds on your end. Our API, for instance, lets you accept standard card payments from customers globally but settles your revenue in USDC directly to your crypto wallet. This approach sidesteps the usual friction of currency conversion and slow bank transfers, letting your customers pay as they normally would while you get predictable, fast stablecoin payouts.
Getting Into the Weeds: Advanced Scenarios and Common Pitfalls
Once you've got the basics down, you’ll find that implementing Stripe’s usage-based billing is less about simply reporting numbers and more about gracefully handling the curveballs that real-world scenarios throw at you. Getting these details right is what separates a clunky, frustrating system from a smooth, customer-friendly one. This is where you can really earn your customer's trust, or lose it.
One of the first hurdles you'll encounter is proration. This is just Stripe's way of handling changes made mid-billing cycle. For example, what happens when a customer upgrades from your basic plan to a premium one halfway through the month? Stripe automatically calculates the cost difference, charging them for the remaining time on the new plan while crediting them for the unused time on the old one.
While Stripe does the heavy lifting on the math, your system still needs to react instantly. This means making sure your app reflects the user's new access level and that any metered components are correctly tied to the new subscription item.
Handling Customer Disputes and Building Trust Through Transparency
Usage-based billing can sometimes feel unpredictable to customers, and a surprise bill is one of the fastest ways to lose them. Transparency isn't just a buzzword here, it's your single best defense against confusion and disputes. The goal is to give your customers a clear, real-time window into their consumption.
The most effective way to do this is by building a usage dashboard right into your application. Don't hide this information. Make it front and center.
- Show Granular Data: Don't just show a total. Let them see daily or even hourly usage so they can connect their activity to the cost.
- Implement Usage Alerts: Empower users by letting them set up notifications when their usage crosses certain thresholds. This helps them manage their spending and avoid sticker shock.
- Explain Your Pricing Clearly: Your pricing page should spell out exactly how each metered component is billed. If you charge per gigabyte, for instance, define precisely what counts toward that total.
When you give customers this level of visibility, you empower them to understand and control their costs. This dramatically cuts down on support tickets and builds lasting trust.
When customers can see their usage tick up throughout the month, the final invoice becomes a simple confirmation of value, not a shock. Proactive transparency is the best way to resolve disputes before they even start.
Backfilling Historical Usage Data
Sometimes, you need to report usage for events that happened in the past, a process known as backfilling. Maybe a part of your system went down, preventing you from reporting usage in real-time. Or maybe you're switching to a usage-based model and need to import historical data to generate that first invoice correctly.
You can backfill data by sending usage records with a timestamp from the past. But there's a big catch: Stripe only allows you to report usage for the current billing period. You can't report usage with a timestamp from a previous, already-invoiced period. Any attempt will just throw an error. This is a crucial limitation to keep in mind, especially when you're planning a migration or recovering from a system outage.
Dealing with Latency and Finalization
Even though Stripe’s systems are incredibly fast, there's still a slight, but important, delay between when you report usage and when it shows up on the upcoming invoice draft. It’s usually minimal, but it’s something to be aware of.
Stripe finalizes an invoice roughly an hour after the billing period officially ends. This one-hour window is your last chance to report any final, last-minute usage that trickled in right at the end of the cycle. Once that invoice is finalized, it's set in stone, and no more usage can be added to it.
While Stripe is a powerhouse for invoicing, we built our Suby API to simplify the other side of the equation: settlement. You can accept card payments from anywhere in the world, and we'll settle your revenue in USDC, eliminating the headaches of cross-border banking and currency conversion.
Simplifying Global Payouts with USDC Settlement
While getting your Stripe usage-based billing system dialed in is a huge win, it really only solves one half of the revenue puzzle. For any business with customers around the world, collecting payments is just the first step. The next, and often trickier, part is actually getting that money into your bank account efficiently across different countries and currencies. This is where a lot of operational drag can sneak in.
With traditional payment processing, you’re constantly battling fluctuating exchange rates, high FX fees that chip away at your profits, and surprise payout delays from international bank transfers. For a modern, lean company, these obstacles can throw a wrench in your cash flow and pile on unnecessary admin work.
A Modern Approach to Global Revenue
Thankfully, there’s a much more direct route for internet-native businesses. Instead of getting tangled up in old-school financial plumbing, you can use a modern payment layer that simplifies global revenue from end to end. Our API at Suby was built to do exactly this. It lets you accept standard card payments from customers anywhere, giving them the smooth checkout they expect.
But on the backend, something different happens. Instead of your revenue getting scattered across various bank accounts in different local currencies, all of your payouts are settled directly in USDC to your digital wallet. This completely changes the game for global sales.
Your customers pay with their card like they always do. Your business gets fast, predictable stablecoin payouts. This simple change sidesteps the headaches of international banking, currency conversion, and settlement delays.
Built for Internet-Native Business Models
This streamlined settlement process is a massive advantage for businesses selling digital products and running online communities. To that end, we also offer native integrations for platforms like Discord and Telegram. These tools let creators and community managers easily set up paid access, handle subscriptions, and monetize their audience without fighting a complex payment setup.
- For SaaS companies, this means you can sell to a global user base and consolidate all your revenue into a single, stable digital asset.
- For online communities, it’s a direct path to monetizing memberships with automated access control and subscription management built right in.
The scale here is hard to overstate. As of 2026, Stripe processes trillions in annual payment volume across millions of websites, serving a huge chunk of Fortune 500 companies. Its usage-based billing features are now active in over 50 countries and 135 currencies, which really drives home how essential global payment acceptance has become. You can dig into Stripe’s scale and its impact on digital commerce in this detailed report.
By pairing a powerful billing engine with a simplified settlement layer, you get the best of both worlds. You can build out sophisticated pricing like Stripe usage-based billing while ensuring your revenue lands in your hands predictably and efficiently. For any business serious about operating on a global scale, that combination is a serious competitive edge. If you're curious how this model applies to other payment methods, you can also learn more about how to accept crypto payments for your business.
Frequently Asked Questions
When you're in the trenches implementing Stripe usage-based billing, a lot of "what if" scenarios pop up. Let's walk through some of the most common questions developers and founders ask as they fine-tune their billing logic.
Can I Bill for Past Usage from Before a Subscription Started?
The short answer is no, you can't. Stripe ties all usage records directly to a subscription's current billing period.
You can backdate usage by sending a timestamp from earlier in the month, but that timestamp absolutely must fall within the active billing cycle. If you try to report usage for a date before the subscription even existed or from a cycle that's already been invoiced and closed, Stripe will throw back an API error. This is a big one to remember, especially if you're migrating customers from another system and have historical usage data you'd like to import.
How Does Stripe Handle Mid-Cycle Subscription Changes?
Stripe handles this automatically with a feature called proration. It’s pretty smart about it, too. When a customer upgrades or downgrades their plan mid-cycle, Stripe does the math for you.
It figures out how much to credit them for the unused portion of their old plan and then charges them for the remainder of the cycle on the new plan. This all gets reconciled on their next invoice, ensuring they only pay for what they actually used. On your end, your main job is to listen for the subscription update webhook so you can immediately grant or restrict access to features based on their new plan.
Think of it this way: with proration, a customer who upgrades on the 15th of a 30-day month is only charged for half a month on the new, higher-tier plan. Stripe automatically credits them for the unused half of the lower-tier plan they already paid for.
What Happens If a Usage-Based Payment Fails?
When a payment for a usage-based invoice doesn't go through, Stripe sends an invoice.payment_failed webhook event. This is your cue to kick off your dunning process.
Your system should be listening for that event to trigger automated recovery steps, like sending friendly emails asking the customer to update their payment details. You can also configure Stripe to automatically retry the payment a few times. If all attempts fail, you'll need to decide on the next step based on your business rules, whether that's canceling the subscription, pausing access, or simply marking it as unpaid.
While Stripe manages billing complexity, we simplify how you receive your revenue. Our API lets you accept card payments from customers globally, but we settle all your funds in USDC. Your customers get a standard checkout experience, and your business receives fast, stablecoin payouts without the usual friction of international banking.
Ready to simplify your global revenue? Get started with Suby and accept card or crypto payments with fast, predictable USDC settlements. Start now.